I’ve blogged before about using BoxStarter to efficiently provision a new development machine.
This is working very well for our developers. Maintaining the installation script takes a bit of effort but the benefits are worth it.
Recently, the chocolatey developers have been making things more secure and recent versions now require a checksum with any downloaded package. For now, there seems to be some difficulty using Install-ChocolateyVsixPackage within BoxStarter scripts.
WARNING:Missingpackagechecksumsarenotallowed(bydefaultforHTTP/FTP,HTTPSwhenfeature'allowEmptyChecksumsSecure'isdisabled)forsafetyandsecurityreasons.Althoughwestronglyadviseagainstit,ifyouneedthisfunctionality,pleasesetthefeature'allowEmptyChecksums'('choco feature enable -n allowEmptyChecksums')Therewereerrorsattemptingtoretrievethevsixfromhttps://visualstudiogallery.msdn.microsoft.com/91aaa139-5d3c-43aorpassintheoption'--allow-empty-checksums'.7-b39f-369196a84fa5/file/44205/7/StopOnFirstBuildError.vsix.Theerrormessagewas'Empty checksums are no longer allowed by default for non-secure sources. Please ask the maintainer to add checksums to this package. In the meantime if you need this package to work correctly, please enable the feature allowEmptyChecksums or provide the runtime switch '--allowEmptyChecksums'. We strongly advise against allowing empty checksums for HTTP/FTP sources.'.AtC:\ProgramData\chocolatey\helpers\functions\Install-ChocolateyVsixPackage.ps1:173char:13etc...
I tried the suggested allowEmptyChecksums but it was still raising an error. After some experimentation it seems that the combination of (temporarily) disabling the checksumFiles feature and enabling allowEmptyChecksums works. Here is the relevant section of my boxstarter script.
1234567891011121314151617181920
# temporarily enable/disable features to bypass checksumschocofeaturedisable-n=checksumFileschocofeatureenable-n=allowEmptyChecksumstry{# VS extensions for all versions of Visual StudioInstall-ChocolateyVsixPackageStopOnFirstBuildErrorhttps://visualstudiogallery.msdn.microsoft.com/91aaa139-5d3c-43a7-b39f-369196a84fa5/file/44205/7/StopOnFirstBuildError.vsixInstall-ChocolateyVsixPackageVisualHGhttps://visualhg.codeplex.com/downloads/get/1475782# VS extensions for VS2015Install-ChocolateyVsixPackageWebEssentials2015https://visualstudiogallery.msdn.microsoft.com/ee6e6d8c-c837-41fb-886a-6b50ae2d06a2/file/146119/19/WebEssentials2015.vsixInstall-ChocolateyVsixPackageWebExtensionPackhttps://visualstudiogallery.msdn.microsoft.com/f3b504c6-0095-42f1-a989-51d5fc2a8459/file/186606/23/Web%20Extension%20Pack%20v1.5.50.vsixInstall-ChocolateyVsixPackageT4Toolbox2015https://visualstudiogallery.msdn.microsoft.com/34b6d489-afbc-4d7b-82c3-dded2b726dbc/file/165481/2/T4Toolbox.14.0.0.71.vsix# CodeRush for Roslyn PreviewInstall-ChocolateyVsixPackageCodeRushForRoslynhttps://visualstudiogallery.msdn.microsoft.com/8a8390ae-1f71-4659-9d8d-5dd56fd8a72e/file/163212/15/DevExpress.CodeRush.Roslyn-16.1.6.vsix}finally{chocofeatureenable-n=checksumFileschocofeaturedisable-n=allowEmptyChecksums}
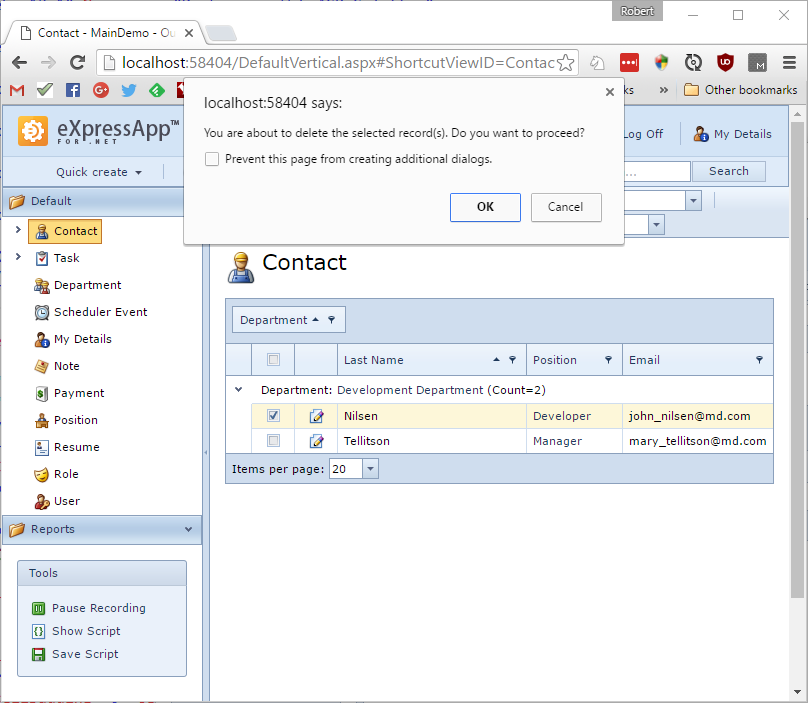
Both Chrome and Firefox have a ‘feature’ which allows a user to ignore future calls to confirm(). Once this has been checked, any subsequent calls to confirm() return false immediately without showing the window.
In XAF, this behaviour prevents the application from working correctly. For instance, it becomes impossible to confirm a deletion.
The following controller provides a work around. It injects some javascript into the page wrapping the call to confirm(). The new code detects when the Prevent this page from creating additional dialogs checkbox has been checked and returns true instead. The confirmation window still does not appear, but the XAF application works as if the user had pressed confirm instead of cancel.
usingDevExpress.ExpressApp;usingDevExpress.ExpressApp.Web;usingDevExpress.Web.Internal;namespaceNetModule.Web.Controllers{publicclassHandleDisabledConfirmationsController:Controller{publicstaticboolIsChrome{get{returnRenderUtils.Browser.IsChrome;}}publicstaticboolIsFirefox{get{returnRenderUtils.Browser.IsFirefox;}}protectedoverridevoidOnFrameAssigned(){base.OnFrameAssigned();if(IsChrome||IsFirefox){WebWindowwindow=FrameasWebWindow;if(window!=null){window.CustomRegisterTemplateDependentScripts+=window_CustomRegisterTemplateDependentScripts;}}}privatevoidwindow_CustomRegisterTemplateDependentScripts(objectsender,CustomRegisterTemplateDependentScriptsEventArgse){// wrapper for 'confirm'WebWindowwindow=(WebWindow)sender;// Detect the user has checked the 'prevent this page from creating additional dialogs'.// In which case assume all confirmations are accepted, rather than the default rejectedvarconfirmWrapper=@"<script>window.nativeConfirm=window.confirm;window.confirm=function(message){vartimeBefore=newDate();varconfirmBool=nativeConfirm(message);vartimeAfter=newDate();if((timeAfter-timeBefore)<350){confirmBool=true;}returnconfirmBool;}</script>";e.Page.ClientScript.RegisterClientScriptBlock(GetType(),"WrapConfirmations",confirmWrapper);}protectedoverridevoidOnDeactivated(){if(IsChrome||IsFirefox){WebWindowwindow=FrameasWebWindow;if(window!=null){window.CustomRegisterTemplateDependentScripts-=window_CustomRegisterTemplateDependentScripts;}base.OnDeactivated();}}}}
The controller works by timing the milliseconds to close the confirmation window. If it is less than 350 milliseconds we can assume the confirmation window never opened owing to the checkbox. In this scenario, it returns true (confirm) rather than false (cancel) in order for XAF to function correctly.
I’ve been trying to get better at chess by playing on chess.com. I often analyse my games with the help of a computer to see where I made mistakes. My favourite way of doing this is to make use of Lichess.org’s import functionality. The latest version of chess.com has greatly improved its own post game analysis, but I still much prefer Lichess’s. So I would often download the finished game in pgn and upload it to Lichess.
Somewhere along the way I came across a Chrome extension written by Allan Rempel which would do this in one step. Unfortunately it stopped working when chess.com upgraded its site and Allan does not seem to be maintaining it any longer. I decided to jump in and try to fix it and maybe add a couple of features myself.
The extension
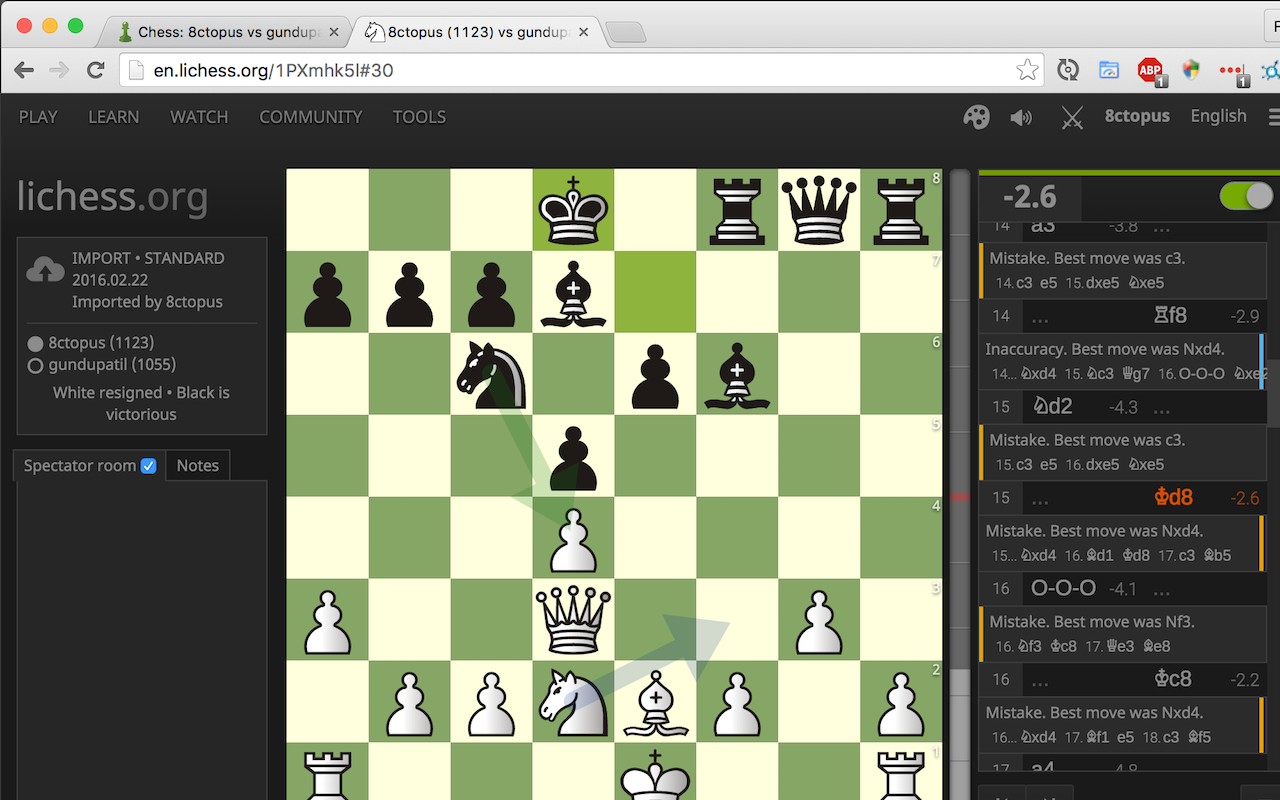
When a chess.com game is finished, you can click on a little knight icon and jump straight to the analysis of the game in Lichess.
It takes a few seconds to process but then you can see all your mistakes and blunders.
You can play through the game and experiment with different variations. Chess.com’s new v3 has greatly improved its own post-game analysis but it still lacks many of the features of the Lichess one.
First thing was to find the code of the existing broken extension. A bit of googling lead me to:
$ cd ~/Library/Application\ Support/Google/Chrome/Default/Extensions/
$ ls

total 0
drwx------+ 30 ra  staff  1020 29 Feb 20:39 .
drwx------+ 66 ra  staff  2244 29 Feb 20:56 ..
drwx------+  2 ra  staff    68 29 Feb 20:39 Temp
drwx------+  3 ra  staff   102 14 Sep  2012 allibancfngcpjmjnnboebggipbaalhn
drwx------+  3 ra  staff   102 28 Mar  2013 anfemphbgknehemmbbajjcmakfijiohp
drwx------+  3 ra  staff   102 25 Oct 08:15 apdfllckaahabafndbhieahigkjlhalf
drwx------+  3 ra  staff   102  5 Mar  2015 bepbmhgboaologfdajaanbcjmnhjmhfn
drwx------+  3 ra  staff   102  5 Jun  2014 bfbameneiokkgbdmiekhjnmfkcnldhhm
drwx------+  3 ra  staff   102 22 Feb 20:09 bhjlkimpkkgkmfjlcfngmakenalgleap
drwx------+  3 ra  staff   102 24 Sep 20:33 blpcfgokakmgnkcojhhkbfbldkacnbeo
drwx------+  3 ra  staff   102 29 Jul  2013 bmihblnpomgpjkfddepdpdafhhepdbek
drwx------+  3 ra  staff   102 13 Sep  2012 boeajhmfdjldchidhphikilcgdacljfm
... etc.
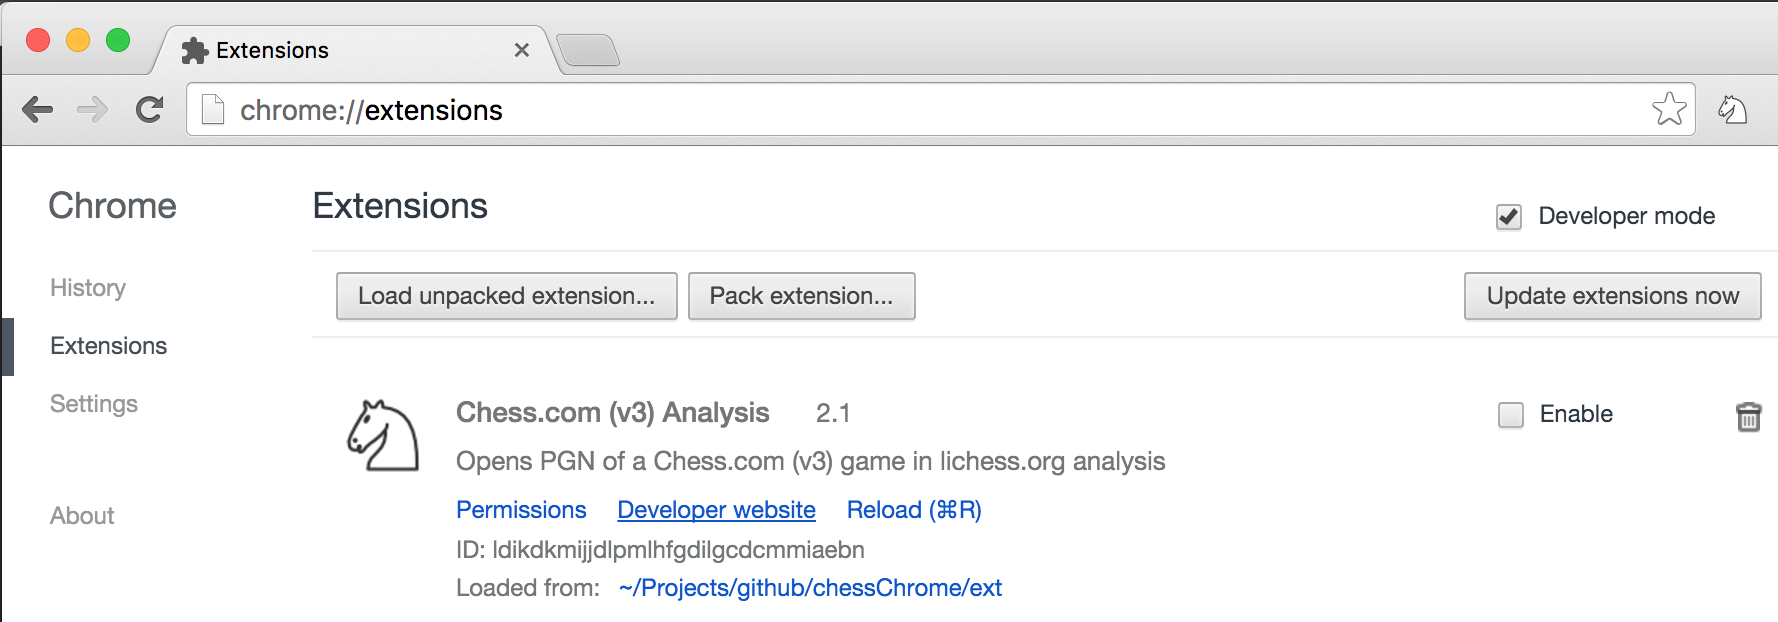
Each extension is in a not very helpfully named folder. If you open chrome://extensions/, you can find the id of any installed extension and work out which directory corresponds to which extension.
So then I dug around in the folder and found ext/background.js where the bulk of the code lies. There is also a manifest.json file which is specifies various parameters such as what permissions are required and which websites will be affected by the extension. I copied all the important files into a development folder.
Loading the extension from the development folder.
Navigate to chrome://extensions
Expand the developer dropdown menu and click “Load Unpacked Extension”
Navigate to development folder
Assuming there are no errors, the extension should load into your browser. Don’t forget to disable any conflicting versions you’ve installed from the Chrome Web Store.
I used the Chrome’s built-in Developer Tools and peppered the code with console.log() to explore how it worked. There are plenty of good resources on the Chrome developer site. I managed to fix the broken parts and added support for analysis from chess.com’s game archive. Then I posted the link on reddit/r/chess.
In the previous posts, the PasswordGenerator always returned ‘Password’. Instead each date should corresponds to a new unique password. We’ll make use of the Crypto-js node package and we’ll see that the AWS lambda copes just fine.
Installing a node package
Pull in the crypto-js package into the serverless component.
$ cd nodejscomponent/
$ npm install crypto-js --save
crypto-js@3.1.6 node_modules/crypto-js
Now we need the typescript definitions. Watch out there are two different TypeScript typings called cryptojs and crypto-js. The first one is more complete.
$ typings install cryptojs --ambient --save
? Found cryptojs typings for DefinitelyTyped. Continue? Yes
Installing cryptojs@~3.1.2 (DefinitelyTyped)...

cryptojs
└── (No dependencies)
I’m not sure why, but there’s no export in the typings file for cryptojs. Add the following to the bottom of the cryptojs.d.ts file.
/// <reference path="../typings/main.d.ts" />importCryptoJS=require("crypto-js");exportfunctioncheckPotd(password:string):boolean{returnnewPasswordGenerator().check(password);}exportclassPasswordGenerator{generate(date:Date):string{// Get the current date as a YYYYMMDD stringvaryyyy=date.getFullYear().toString();varmm=(date.getMonth()+1).toString();// getMonth() is zero-basedvardd=date.getDate().toString();varplain=`${yyyy}${mm}${dd}`;// Using AES CTR with 32 byte key and iv ensures the encrypted string is not too long// See http://stackoverflow.com/a/13298019/1077279varkey=CryptoJS.enc.Hex.parse('108c786594543687891374723e809ec5e475a8361f7ad82df04e91ba2c139321');// Use a different initialization vector each time by using the date as part of the vectorvariv=CryptoJS.enc.Hex.parse(plain+'3a8fe4440be1e113a271574f379d70a76c3477aaff036d1e83fcd4b9');varoptions={mode:CryptoJS.mode.CTR,padding:CryptoJS.pad.NoPadding,iv:iv};varencrypted=CryptoJS.AES.encrypt(plain,key,options);returnencrypted.ciphertext.toString();}check(password:string):boolean{// check the value matches today's password of the dayreturnpassword==this.generate(newDate());}}
Run the tests
We expect the tests to fail now since we are no longer returning the same password.
123456789101112131415161718192021222324252627
$ npm test> @0.0.1 pretest /Users/ra/Projects/Coprocess/serverlessPotd/nodejscomponent
> tsc
> @0.0.1 test /Users/ra/Projects/Coprocess/serverlessPotd/nodejscomponent
> mocha ./lib/test
Generator
#generate 1) should generate the password
#check ✓ should return false when the password is incorrect
#check 2) should return true when the password is correct
1 passing (16ms) 2 failing
1) Generator #generate should generate the password: Error: Expected 'Password' but was bb4bde4d76b055
at Context.<anonymous> (lib/test/passwordOfTheDayTest.js:12:23) 2) Generator #check should return true when the password is correct: Error: Expected 'true' but was falseat Context.<anonymous> (lib/test/passwordOfTheDayTest.js:28:23)npm ERR! Test failed. See above for more details.
Update and improve the tests
It’s getting a little more complicated so let’s pull in chai which is a pretty assertions library.
/// <reference path="../../typings/main.d.ts" />importPasswordOfTheDay=require("../passwordOfTheDay");importChai=require("chai");// Tell chai that we'll be using the "should" style assertions.Chai.should();describe("Generator",()=>{varsubject:PasswordOfTheDay.PasswordGenerator;beforeEach(function(){subject=newPasswordOfTheDay.PasswordGenerator();});describe("#generate",()=>{it("should generate the password when the date is 24th July 2010",()=>{vardate:Date=newDate(2010,6,24);varpassword:string=subject.generate(date);password.should.equal("92ab1ff89bf9af");});});describe("#generate",()=>{it("should generate a different password when the date is 25th July 2010",()=>{vardate:Date=newDate(2010,6,25);varpassword:string=subject.generate(date);password.should.equal("26a394b21800f1");});});describe("#check",()=>{it("should return false when the password is incorrect",()=>{varpassword:string="garbage";varresult:boolean=subject.check(password);result.should.be.false;});});describe("#check",()=>{it("should return false when the password is null",()=>{varpassword:string=null;varresult:boolean=subject.check(password);result.should.be.false;});});describe("#check",()=>{it("should return true when the password is correct",()=>{varpassword:string=subject.generate(newDate());varresult:boolean=subject.check(password);result.should.be.true;});});});
Run our tests:
123456789101112131415161718192021
$ npm test> @0.0.1 pretest /Users/ra/Projects/Coprocess/serverlessPotd/nodejscomponent
> tsc
> @0.0.1 test /Users/ra/Projects/Coprocess/serverlessPotd/nodejscomponent
> mocha ./lib/test
Generator
#generate ✓ should generate the password when the date is 24th July 2010
#generate ✓ should generate a different password when the date is 25th July 2010
#check ✓ should return false when the password is incorrect
#check ✓ should return false when the password is null
#check ✓ should return true when the password is correct
5 passing (20ms)
Deploy
$ serverless dash deploy
Now when we visit the endpoint with the correct password for today’s date which happens to be 89366e6199f3.
Mission accomplished! Notice that using a node package did not require any special steps on the AWS side. In fact we have not had to login to AWS since the very beginning when we created an IAM user for the project. And yet we’ve managed to build and deploy a cheap and scalable cloud-based service.
The source code is on GitHub. Note the default .gitignore file skips the admin.env file which contains the (sensitive) AWS keys in it so don’t forget to add your own.
That wraps up my series on building a small, but real-world Serverless application. In a future post, I’d like to look at providing a secured ‘generate’ service to allow authorized users to get today’s password. Stay tuned.
Edit: since the original version of this post, a new version 0.3.1 of Serverless was released. I have updated the tutorial below to reflect the newer version. Also, TSD has been deprecated in favour of Typings so I’ve updated to use Typings instead.
All parts have been updated for the latest version of the framework 0.3.1.
The Password of the Day Generator class
First up we need a class to generate and check the password of the day. For the moment, let’s pretend the password of the day is always the string “Password”. Put the following typescript class in nodejscomponent/src.
nodejscomponent/src/passwordOfTheDay.ts
12345678910111213141516171819
exportfunctioncheckPotd(password:string):boolean{returnnewPasswordGenerator().check(password);}exportclassPasswordGenerator{generate(date:Date):string{// generate today's passwordreturn"Password";}check(password:string):boolean{// check the value matches today's password of the dayreturnpassword==this.generate(newDate());}}
/// <reference path="../../typings/main.d.ts" />importPasswordOfTheDay=require("../passwordOfTheDay");describe("Generator",()=>{varsubject:PasswordOfTheDay.PasswordGenerator;beforeEach(function(){subject=newPasswordOfTheDay.PasswordGenerator();});describe("#generate",()=>{it("should generate the password",()=>{varresult:string=subject.generate(newDate(2010,6,24));if(result!=="Password"){thrownewError("Expected 'Password' but was "+result);}});});describe("#check",()=>{it("should return false when the password is incorrect",()=>{varresult:boolean=subject.check("garbage");if(result!==false){thrownewError("Expected 'false' but was "+result);}});});describe("#check",()=>{it("should return true when the password is correct",()=>{varresult:boolean=subject.check("Password");if(result!==true){thrownewError("Expected 'true' but was "+result);}});});});
Now compile everything.
$ cd nodejscomponent
$ tsc
You will now find that there is a corresponding javascript file in the lib folder
nodejscomponent/src/passwordOfTheDay.js
123456789101112131415161718
functioncheckPotd(password){returnnewPasswordGenerator().check(password);}exports.checkPotd=checkPotd;varPasswordGenerator=(function(){functionPasswordGenerator(){}PasswordGenerator.prototype.generate=function(date){// generate today's passwordreturn"Password";};PasswordGenerator.prototype.check=function(password){// check the value matches today's password of the dayreturnpassword==this.generate(newDate());};returnPasswordGenerator;})();exports.PasswordGenerator=PasswordGenerator;
And likewise for the mocha test in lib/test. Now to run those tests:
$ npm test

> @0.0.1 pretest /Users/ra/Projects/Coprocess/serverlessPotd/nodejscomponent
> tsc

> @0.0.1 test /Users/ra/Projects/Coprocess/serverlessPotd/nodejscomponent
> mocha ./lib/test

Generator
    #generate
    ✓ should generate the password
    #check
    ✓ should return false when the password is incorrect
    #check
    ✓ should return true when the password is correct

3 passing (10ms)
Nice. Next, modify the main entry point of the component index.js.
Rock and roll. A working password checker running on Lambda in the Amazon cloud.
Next up - we’ll extend the PasswordGenerator class to pull in a node package and generate a better password.
The source code so far is on GitHub. Note the default .gitignore file skips the admin.env file which contains the (sensitive) AWS keys in it so don’t forget to add your own.
This is part of an ongoing series about the Serverless framework. For those following along, part 1 and part 2 have been updated for the current latest version of Serverless 0.3.1.
In this post, we’ll discuss how a Serverless function actually works.
The guts of a serverless function
When we visited the deployed endpoint at the end of part 1, it correctly returned some JSON content.
123
{message:"Your Serverless function ran successfully!"}
Where does this message come from? Look at index.js in the component’s lib folder.
nodejscomponent/lib/index.js
123456789101112
/** * Lib */module.exports.respond=function(event,cb){varresponse={message:"Your Serverless function ran successfully!"};returncb(null,response);};
And it’s the handler.js file in the function’s subfolder which calls it.
nodejscomponent/potd/check/handler.js
12345678910111213141516171819202122
'use strict';/** * Serverless Module: Lambda Handler * - Your lambda functions should be a thin wrapper around your own separate * modules, to keep your code testable, reusable and AWS independent * - 'serverless-helpers-js' module is required for Serverless ENV var support. Hopefully, AWS will add ENV support to Lambda soon :) */// Require Serverless ENV varsvarServerlessHelpers=require('serverless-helpers-js').loadEnv();// Require Logicvarlib=require('../../lib');// Lambda Handlermodule.exports.handler=function(event,context){lib.respond(event,function(error,response){returncontext.done(error,response);});};
In our case we’re coding a password checking function. The URI will look something like this:
We’ll modify lib/index.js to retrieve the value from the query parameter password and return true if the password is correct and false otherwise. But first we need to set up the parameter.
Configuring the function parameter
In each function’s directory, there is a file named s-function.json which allows you to specify the details of the function call. Add a section to the requestTemplates as follows:
Note that the s-function.json file is also where you can configure if the service accepts POST or PUT or DELETE requests. Here we are only interested in GET.
You can easily tailor the requestTemplates in this file to extract whatever parameters you need in your lambda function.
Retrieving the parameter value
Now back in index.js you will find that the function’s event parameter has a property password which is set to the value of the querystring parameter.
nodejscomponent/lib/index.js
123456789
module.exports.respond=function(event,cb){varparameterValue=event.password;// the querystring parametervarresponse={message:parameterValue};returncb(null,response);};
This is the second part of a series about the Serverless framework. Read the first part to get up and running.
First I’ll describe the webservice I’m building. Then we’ll configure our environment for Typescript and Mocha testing.
Poor man’s dual factor authentication via a password of the day
I’m the technical lead for an enterprise application which is in use by about 100 large multinational corporates. As part of the installation process, we ask for a registration code which is based on the date. The customer has to call us to get the password of the day. This gives us an opportunity to engage with the customer and also gives us little more control. It’s a simple form of dual factor authorization where one of the factors requires a phone call.
In the old days, the routine for checking the validity of the password was part of the source code, but we’ve since moved the checking function to a web service.
It’s my goal to replace this ‘password of the day’ check function with a Serverless module. The service will take a password as input and check that it matches the password of the day.
It’s a tiny, simple, rarely-used web service but AWS lambda is still a great fit for it. Although lambda can scale if necessary, in this case it’s about not having the hassle of administering a server.
Mocha and TypeScript
New version 0.3.1
Edit: since the original version of this post, a new version 0.3.1 of Serverless was released. I have updated the tutorial below to reflect the newer version. Also, TSD has been deprecated in favour of Typings so I’ve updated to use Typings instead.
Let’s do things properly and set up a testing framework.
Next we’ll install TypeScript. Of course you can use plain javascript if you prefer. My background is C#: I make fewer dumb mistakes with TypeScript. It looks like there is a typescript plugin in the pipeline which will make typescript integration even easier in the future, but for now:
Now make a subdirectory for our TypeScript source files.
$ mkdir src
$ mkdir src/test
Next up we need to modify the package.json file to add a scripts section. Only the "scripts" section needs changing.
package.json
12345678910111213141516171819202122232425
{"name":"potd","version":"0.0.1","description":"Dependencies for a Password of the day Serverless Module","author":"Robert Anderson","license":"MIT","private":true,"repository":{"type":"git","url":"git://github.com/"},"keywords":[],"devDependencies":{"mocha":"^2.3.4"},"dependencies":{"serverless-helpers-js":"~0.0.3","typescript":"^1.7.5"},"scripts":{"prepublish":"tsc","pretest":"tsc","test":"mocha ./lib/test"}}
We’ve finished setting up everything for TypeScript and Mocha. Whenever you run tsc, any TypeScript files in /src will get compiled to javascript in /lib. And running npm test will compile and then run any Mocha tests in /lib/test.
The source code so far is on GitHub. Note the default .gitignore file skips the admin.env file which contains the (sensitive) AWS keys in it so don’t forget to add your own.
In the next post we’ll create a TypeScript class for the guts of the lambda function which checks the password of the day, along with some corresponding Mocha tests, also written in TypeScript.
Edit: since the original version of this post, a new version 0.3.1 of Serverless was released. I have updated the tutorial below to reflect the newer version.
I was in the middle of a blog post about the JAWS framework and before I had finished it changed its name to the Serverless framework. It is a very clever way to build apps without worrying about provisioning server or whether it will scale. This is because it uses Amazon Web Services and in particular the Amazon lambda compute service. It’s currently in beta.
Follow the instructions for setting up an administrative IAM user for use with the framework.
Make sure you have node and npm installed. You need node 4.0 or greater.
$ node -v
v4.2.3
$ npm -v
2.14.7
Install the Serverless framework.
$ npm install serverless -g
Create a new project
$ serverless project create
123456789101112131415161718192021222324252627
 _______                             __
|   _   .-----.----.--.--.-----.----|  .-----.-----.-----.
|   |___|  -__|   _|  |  |  -__|   _|  |  -__|__ --|__ --|
|____   |_____|__|  \___/|_____|__| |__|_____|_____|_____|
|   |   |             The Serverless Application Framework
|       |                           serverless.com, v0.3.1
`-------'

Serverless: Initializing Serverless Project...
Serverless: Enter a name for this project:  (serverless-vyedql) serverlessPotd
Serverless: Enter a universally unique project bucket name:  (serverless-vyedql-4jboce.com) potd-zerosharp.com
Serverless: Enter an email to use for AWS alarms:  (me@serverless-vyedql.com) potd@nosredna.com
Serverless: Select a region for your project:
    us-east-1
    us-west-2
  > eu-west-1
    ap-northeast-1
Serverless: Select an AWS profile for your project:
  > default
Serverless: Creating stage "dev"...
Serverless: Creating region "eu-west-1" in stage "dev"...
Serverless: Creating your project bucket on S3: serverless.eu-west-1.potd-zerosharp.com...
Serverless: Deploying resources to stage "dev" in region "eu-west-1" via Cloudformation (~3 minutes)...
Serverless: Successfully deployed "dev" resources to "eu-west-1"
Serverless: Successfully created region "eu-west-1" within stage "dev"
Serverless: Successfully created stage "dev"
Serverless: Successfully initialized project "serverlessPotd"
It takes about 3 minutes to setup the necessary CloudFormation stack for your project. Change directory to the newly created project.
$ cd serverlessPotd
Create a new component.
$ serverless component create
1234567891011
Serverless: Enter a name for your new component:  (nodejscomponent)
Serverless: Enter a name for your component's first module:  (resource) potd
Serverless: Enter a name for your module's first function:  (show) check
Serverless: Successfully created function: "check"
Serverless: Successfully created new serverless module "potd" inside the component "nodejscomponent"
Serverless: Installing "serverless-helpers" for this component via NPM...
Serverless: -----------------
serverless-helpers-js@0.0.3 node_modules/serverless-helpers-js
└── dotenv@1.2.0
Serverless: -----------------
Serverless: Successfully created new serverless component: nodejscomponent
This has created the javascript code for a basic lambda function which we can immediately deploy.
$ serverless dash deploy
At the prompt select both the function and the endpoint and then select Deploy.
 _______                             __
|   _   .-----.----.--.--.-----.----|  .-----.-----.-----.
|   |___|  -__|   _|  |  |  -__|   _|  |  -__|__ --|__ --|
|____   |_____|__|  \___/|_____|__| |__|_____|_____|_____|
|   |   |             The Serverless Application Framework
|       |                           serverless.com, v0.3.1
`-------'

Use the <up>, <down>, <pageup>, <pagedown>, <home>, and <end> keys to navigate.
Press <enter> to select/deselect, or <space> to select/deselect and move down.
Press <ctrl> + <enter> to immediately deploy selected.


Serverless: Select the assets you wish to deploy:
    nodejscomponent - potd - check
      function - nodejscomponent/potd/check
      endpoint - nodejscomponent/potd/check@potd/check~GET
    - - - - -
  > Deploy

Serverless: Deploying functions in "dev" to the following regions: eu-west-1
Serverless: ------------------------
Serverless: Successfully deployed functions in "dev" to the following regions:
Serverless: eu-west-1 ------------------------
Serverless:   nodejscomponent/potd/check: arn:aws:lambda:eu-west-1:962613113552:function:serverlessPotd-nodejscomponent-potd-check:dev

Serverless: Deploying endpoints in "dev" to the following regions: eu-west-1
Serverless: Successfully deployed endpoints in "dev" to the following regions:
Serverless: eu-west-1 ------------------------
Serverless:   GET - potd/check - https://rhnjv4ms2b.execute-api.eu-west-1.amazonaws.com/dev/potd/check
Now open a browser and navigate to the URL in the last line. You should see the following JSON response.
123
{message:"Your Serverless function ran successfully!"}
Now that’s already fantastic. With a handful of commands we have deployed an arbitrary javascript function to a URL endpoint very cheaply and with automatic scaling. We never had to consider instance size or memory or operating system.
And it’s extremely extensible too - thanks to the other AWS services, we can easily make it secure (with Amazon Cognito) kick off emails (SES), store files (S3), add persistence (DynamoDB), etc.
In the next post, I’ll be applying it to a real life scenario to replace an existing web service.
This is the second and final dive into some of the new DevExpress XAF 2015.2 features. The first part covers the Report Designer and the new XML serialisation.
Batch editing
Another feature I’m excited about is the support for batch editing within the web application grids.
Let’s see what happens when combined with the validation rules. What happens if I edit two rows but only one has a validation problem - does the whole batch get rejected? Or just the row with the problem?
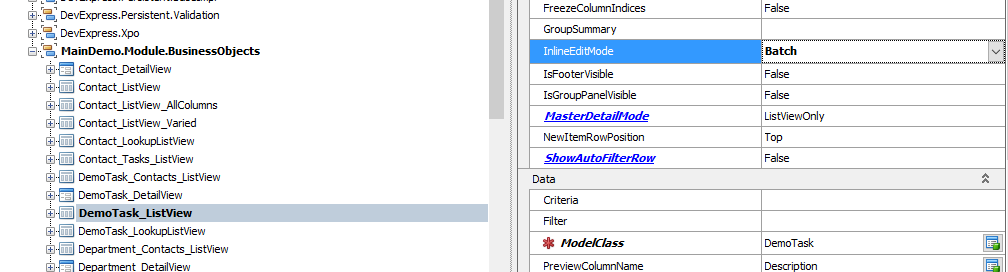
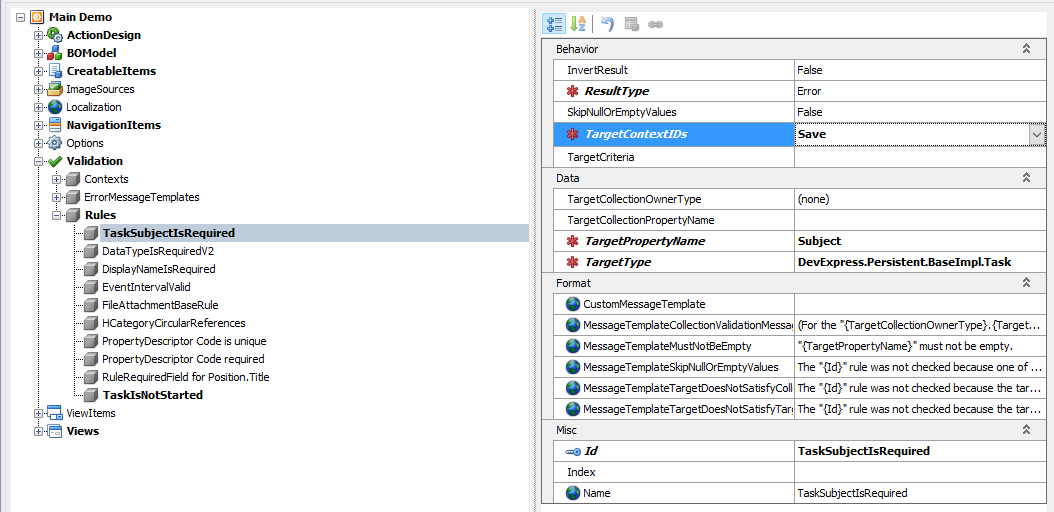
First I modified the edit mode of the Tasks grid to Batch via the model.
Then I added a new RuleRequiredField validation rule via the model.
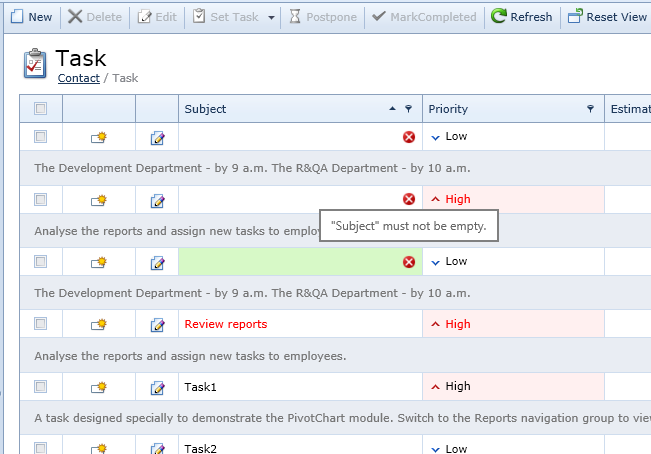
I started up the MainDemo application and navigated to the Tasks view and tried to delete the subject of multiple rows at the same time.
I never even got to press Save because of another new 15.2 feature: inplace validation! The rules are being validated without a round trip to the server!
So let’s try another way. Inplace Validation does not work with all rule types, so I deleted my RuleRequiredField from the model and instead added a new RuleFromBoolProperty to the DemoTask object as follows:
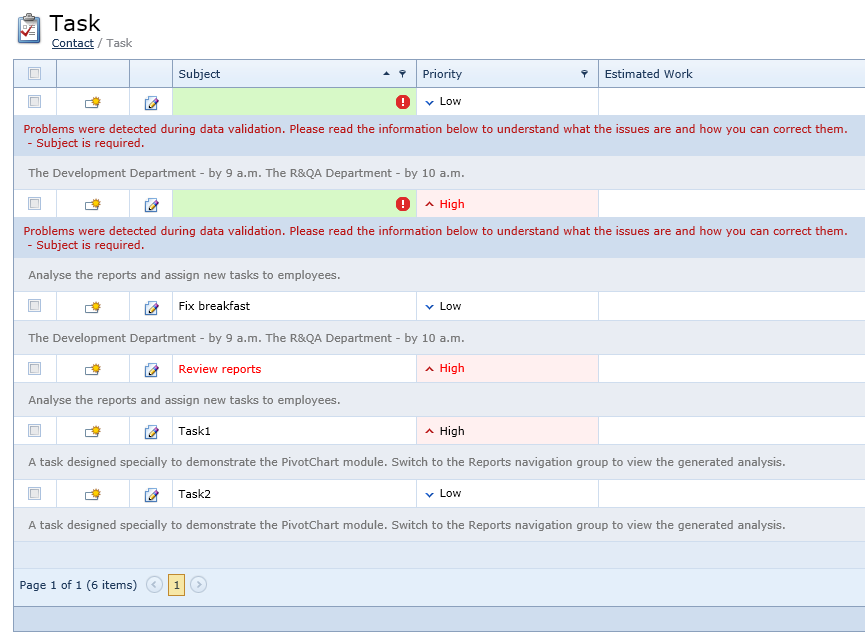
Now we go back to the list view for Task and try to set multiple subjects to empty.
Fantastic! This time the broken rules appear for each row and it is quite clear which message belongs to which object.
So the batch editing makes use of inplace validation when it can, but handles more complex validation rules well too. This is an excellent combination because the inpalce validation will help to make the client seem very quick and responsive.
Conclusion
This concludes my review of DevExpress 2015.2. We’ve looked in some detail at two of the most impressive new features - the way reports are serialised and the improvements to client-side validation. These changes help with performance and ease of maintenance and I’m very happy to see that the DevExpress team has focused on these areas. Looking forward to the 2016 releases!
Rather than repeat general overviews provided in these, this two-part blog post is more of a ‘deep dive’. In particular I’ll be looking at two of the new features in the expressApp Framework (XAF).
Today I’ll cover the new XML serialisation in the report designer. Tomorrow’s post will examine the new batch editing features.
Reports
Reporting is definitely one of the areas where XAF has progressed the most in recent versions. There is now an in-browser report designer (since 14.2) and an alternative implementation of the reports (reports v2, since 13.2).
In this release, I was a little worried that the support for Reports v1 would be deprecated, since our production system has over 100 custom reports and we have not yet looked for an easy way to migrate these to v2. I’m happy to report that v1 reports are still very much present.
However there are also a number of new features in v2 Reports, not least of which is the ability to store the report’s layout in XML. There’s currently not a lot of documentation about the XML serialization, so let’s dig in and see what we can discover.
XML serialization deep dive
First I ran the demo and ran the Copy Predefined Report on the Contacts Report.
Then I ran the report designer and added a dummy OnBeforePrint() script to one of the table’s cells.
This creates two output files. One of them contains the familiar .repx format. The other contains the newer .xml serialization.
The contents of the XML file is displayed below and is 77 lines long.
By comparison, the ContactReport.repx is 408 lines long and much harder to read.
As you can see the XML file is much smaller and simpler than the .repx file. At first I didn’t believe it contained all the necessary information, so I started up the MainDemo WinForms application, created a blank new report and imported the layout and the layout looks correct and the preview loads with data as expected.
Scripts
What about scripts? Are they serialized in the xml version? You bet. In the XML export you can see this has been serialised near the top of the file.
123
ScriptsSource=
"
private void xrTableCell8_BeforePrint(object sender, System.Drawing.Printing.PrintEventArgs e) {
  var x = 23;
}
"
Setup
In order to use this new XML serialization of report layouts, you must set the ReportsV2 module to use it.
This will most likely invalidate any reports which have already been serialized to the database. There are some notes on how to fix this here.
Default for new projects
What about new projects? I created a new solution and chose DevExpress 15.2 XAF Solution Wizard as the type of solution and added the reports module. Now when I navigate to the WinApplication.Designer.cs file, I find:
So the default storage method for new projects is now XML.
Conclusion
The XML serialisation looks like a considerable upgrade to the mechanism for storing, loading and saving reports. Now I just need to find a good way of converting my existing v1 reports… Perhaps a future blog post.