ZeroSharp

Robert Anderson's ones and zeros

Setting Up Octopress on Windows Again

| Comments

My very first blog post was about setting up Octopress. The following is an updated version of those instructions for setting up Octopress with Windows, ruby 1.9.3, python 2.7.3.

This is quick guide to setting up Octopress to publish to GitHub pages. I’m using Windows 8 64-bit, but the instructions should work with other versions of Windows.

Get with GitHub

First, get an account on GitHub and follow the excellent instructions for Windows here. here.

Once you are set up with GitHub, get yari by opening a command prompt:

Then create a directory for all your github projects. You could put this anywhere, e.g., %USERPROFILE%\github. I chose to create a directory C:\projects\github\.

Installing Octopress

Use yari instead of RVM/rbenv

Scott Muc has written yari which lets you switch between Windows Ruby versions. Get it with the following command.

cd C:\projects\github\
git clone git://github.com/scottmuc/yari.git yari

Once this has completed you can setup the required Ruby environment with the command:

yari 1.9.3

Then follow the rest of the instructions from the Octopress setup instructions.

git clone git://github.com/imathis/octopress.git octopress
cd octopress
ruby --version  # Should report Ruby 1.9.3 thanks to yari

Next install dependencies

gem install bundler
bundle install

Install the default Octopress theme.

rake install

Deploying to GitHub

The instructions are here. The only difficulty I had was working out which URL to use after:

rake setup_github_pages

This will ask you for your Github Pages repository url, but it is not clear that this is the SSH one, e.g., git@github.com:ZeroSharp/zerosharp.github.com.git. You can find it near the top of the repository page.

Configuring your blog

Follow the instructions here to configure your blog.

Markdown

It is quite difficult to find good help on the markdown syntax other than for the codeblocks section. For instance, it is not clear how to generate a codeblock with no line numbers, like this one:

How do I output a codeblock with no line numbers?

It turns out it either requires a <pre> tag instead of a { codeblock } tag, or alternatively, start the line with four spaces. The official syntax is here, but I also found this cheat sheet.

Fonts and Styles

See Lee’s Bigdinosaur blog.

Problem with CodeBlocks

I had a problem with codeblocks which seems to be specific to Windows. It seems that whenever you include a lang parameter in a codeblock, you get:

Liquid error: No such file or directory - python2.7 -c “import sys; print sys.executable”

There are two issues:

  • Syntax highlighting requires Python which is not automatically installed.
  • There is a problem with pythonexec.rb which does not seem to support Windows Python installations very well.

Luckily we can fix them both. Install Python 2.7.3. Actually I used ninite.com to install it.

Then modify the pythonrubyexec.rb which is in the depths of the yari subdirectory. Try here: .\yari\ruby-1.9.3-p194-i386-mingw32\lib\ruby\gems\1.9.3\gems\rubypython-0.5.3\lib\rubypython\pythonexec.rb

At the top of pythonexec.rb, modify the file as follows:

pythonexec.rb
1
2
3
4
5
6
7
8
9
10
11
12
13
14
class RubyPython::PythonExec
  def initialize(python_executable)
    @python = python_executable || "python"

+    if (@python.include? 'python2.7')
+      @python = "python"
+    end

    @python = %x(#{@python} -c "import sys; print sys.executable").chomp

    @version = run_command "import sys; print '%d.%d' % sys.version_info[:2]"

-    @dirname = File.dirname(@python)
+    @dirname = "C:/Python27"

Better Handling of Decimals in the XAF Audit Trail

| Comments

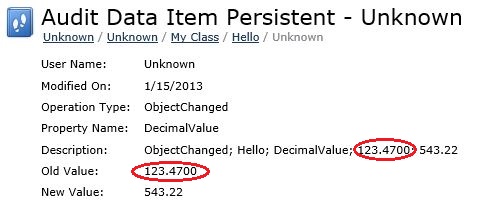
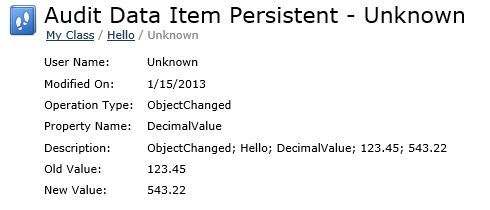
The following screenshot shows the detail view of an object change from the DevExpress XAF Audit Trail. The DecimalValue property was changed from 123.45 to 543.22.

Why is the OldValue property is displayed with two trailing zeros? The corresponding property is defined as follows:

1
2
3
4
5
6
7
8
9
10
11
12
13
14
15
16
17
18
19
20
21
22
23
24
25
26
27
28
29
30
31
32
33
34
35
36
[DefaultClassOptions]
public class MyClass : XPObject
{
    public MyClass(Session session)
        : base(session)
    { }

    //...

    private decimal _DecimalValue;
    [ModelDefault("DisplayFormat", "{0:n2}")]
    public decimal DecimalValue
    {
        get
        {
            return _DecimalValue;
        }
        set
        {
            SetPropertyValue("DecimalValue", ref _DecimalValue, value);
        }
    }

    private XPCollection<AuditDataItemPersistent> _ChangeHistory;
    public XPCollection<AuditDataItemPersistent> ChangeHistory
    {
        get
        {
            if (_ChangeHistory == null)
            {
                _ChangeHistory = AuditedObjectWeakReference.GetAuditTrail(Session, this);
            }
            return _ChangeHistory;
        }
    }
}

Explanation and fix

A C# decimal is a type which represents a number’s value and its precision. It actually stores the number of trailing zeros along with the value. For the NewValue, it has stored the decimal value as the user entered it - with no trailing zeros. Howevever, for the OldValue, it has retrieved the value from the database and used the SQL column definition to determine the precision.

The default SQL column type that XPO column type for properties of type decimal is the money type (see the MSDN documentation) which stores 4 decimal places of precision. If we override this with, say, a DECIMAL(28, 13), the audit trail would show 13 decimal places of precision.

From the user’s perspective, this looks a little confusing, so let’s fix it.

During the initialization of your application (in Application_Start for a web application), add an event to the AuditTrailService as follows.

AuditTrailConfig.Initialize();

and then declare the AuditTrailConfig helper class as follows:

1
2
3
4
5
6
7
8
9
10
11
12
13
14
15
16
17
18
19
20
21
22
23
24
public static class AuditTrailConfig
{
    public static void Initialize()
    {
        AuditTrailService.Instance.SaveAuditTrailData += Instance_SaveAuditTrailData;
    }

    static void Instance_SaveAuditTrailData(object sender, SaveAuditTrailDataEventArgs e)
    {
        NormalizeOldValuesDecimalPrecision(e);
    }

    private static void NormalizeOldValuesDecimalPrecision(SaveAuditTrailDataEventArgs e)
    {
        var decimalAuditTrailDataItems = e.AuditTrailDataItems
                                          .Where(i => i.OldValue is decimal);

        foreach (AuditDataItem auditTrailItem in decimalAuditTrailDataItems)
        {
            // remove any trailing zeros from OldValue
            auditTrailItem.OldValue = ((decimal)auditTrailItem.OldValue).Normalize();
        }
    }
}

The Normalize() method is an extension method. See the trick in my last post for more information.

1
2
3
4
5
6
7
public static class DecimalExtensions
{
    public static decimal Normalize(this decimal value)
    {
        return value / 1.000000000000000000000000000000000m;
    }
}

And then the same change would be logged as follows.

How to Remove the Trailing Zeros of Precision From a C# Decimal

| Comments

You may know that the C# Decimal type remembers any trailing zeros. So for instance:

Console.WriteLine(123.45m);
Console.WriteLine(123.45000m);
Console.WriteLine(123.4500000m);

results in

123.45
123.45000
123.4500000

This is because the Decimal type is designed for representing a number including its accuracy.

It is tricky to find a good way of controlling this accuracy. If I have x = 123.45000, how can I easily remove the trailing zeros so that x.ToString() outputs 123.45?

For a while it looked like I’d have to perform some Jon Skeet wizardry, but there is a simpler solution. The following extension method will remove all the trailing zeros.

public static class DecimalExtensions
{
    public static Decimal Normalize(this Decimal value)
    {
        return value / 1.000000000000000000000000000000000m;
    }
}

And if you need an exact number of trailing zeros, you can first Normalize() and then multiply.

Console.WriteLine(123.45m.Normalize() * 1.000m); 

will output the following.

123.45000

How I Went From C# Developer to iPhone Developer in a Weekend

| Comments

Recently I took part in Startup Weekend Buenos Aires. It works just like most hackathons:

New friends: Caro, Eze, Gus and me

  • You give a one minute pitch on Friday evening.
  • Winners put together a team.
  • You work with your team on Saturday and Sunday to launch a product.
  • Demo for the judges.
  • Prizes. Beer. Sleep.

On the Friday I spoke no Spanish and had no idea how to write an iPhone app. By Sunday I still spoke no Spanish, but I’d built my first app and it won second prize!

How did I learn Objective-C in a weekend? I didn’t. I wrote it in C#.

I downloaded Xamarin MonoTouch onto my MacBook Pro and was following the ‘Hello World’ tutorial within an hour. The MonoTouch documentation is very clear and the samples are very useful. Very soon I had a multiple screen application built, including capturing an image from the camera.

Monotouch makes mobile development really easy for C# programmers. It’s also cross-platform so you can re-use big chunks of your code when you write the Android version.

Check out this recent blog post from the guys at Xamarin.

Deploy XAF ASP.NET Applications to Amazon Web Services: Part 5

| Comments

Part 5: Load balancing

This is the final post in this 5 part series about deploying XAF to the Amazon cloud. The other parts are:

This part covers load balancing and autoscaling.

Load balancing

In order to enable load balancing with DevExpress XAF applications, you must activate client affinity (sticky sessions) which you can do in the Load Balancer tab.

This is because XAF relies http session variables (notably the WebApplication). With sticky sessions enabled, when a user first hits the Elastic Load Balancer, they are assigned a random server but all subsequent requests are routed to the same server instance.

Autoscaling

Adding Capacity (Works)

Switch to the Auto Scaling tab of the Elastic Beanstalk instance.

The options for autoscaling are extensive and there is plenty information on the Amazon website. In the above screenshot we have the Elastic Load Balancer configured so that it will initially deploy 1 server (the Minimum Instance Count), but whenever the NetworkOut measurement of 600,000 bytes over a 5 minute interval, a new server launch is triggered up to a maximum of 4 servers. Adding capacity works fine with XAF applications.

Removing Capacity (Fails)

The configuration above also shows that if the NetworkOut drops to below 200,000 bytes over a period of 5 minutes then the number of servers should decrease. This will NOT work.

The problem is that the Elastic Load Balancer will terminate the surplus server immediately (the equivalent of a shutdown -s). Any users connected to that server will immediately lose their session and will probably receive an ugly error.

One workaround is to allow scaling out but to disable scaling in. To do this, set the ‘Lower Threshold’ to zero.

Possible Improvements

There are a couple of potential longer term solutions to the problem of dropped sessions when scaling in.

DevExpress could make the classes they use in the session variables serializable (e.g., WebApplication). When this is the case, the application can be configured to store the session variables to a persistent data store (SQL Server for instance) instead of in the session and then we could configure autoscaling to work correctly. There is an item in the Support Center in this regard and another one here.

Another solution would be if Amazon provided a new option to handle a server termination in a less brutal fashion. That is, stop routing new users to the surplus server but continue to server existing users until their sessions have all terminated. This approach is discussed in this AWS forum thread.

Conclusions

The load balancing features of AWS work fine with XAF applications, but the benefits of autoscaling are lost because there is currently no effective method of removing capacity without knocking out existing sessions.

What next

In a future series, I will demonstrate how to load test XAF applications cheaply and effectively by making use of Amazon Web Services. Stay tuned.

Deploy XAF ASP.NET Applications to Amazon Web Services: Part 4

| Comments

Part 4: Incremental Deployment

This is the fourth post in a series about deploying ASP.NET applications to the Amazon cloud. In the first three posts covered deploying the XAF ASP.NET MainDemo to the Amazon cloud (Part 1, Part 2, Part 3).

When we deployed to the Elastic Beanstalk in Part 2, we chose not to enable incremental deployment.

I want to explain this decision further.

If you choose not to deploy incrementally your deployment will take longer because the entire web deployment package needs to be uploaded every time you re-publish which takes about 4-5 minutes on my connection. The incremental deployment option creates a git repository in the target environment so that only the modified files are re-deployed. If you are frequently making changes and redploying, you can save considerable time. A re-deployment takes only a few seconds.

However, if you try to deploy from the default MainDemo location with incremental deployment enabled, you will probably get the following error

Commencing deployment for project MainDemo.Web
...building deployment package obj\Release\Package\Archive...
...deployment package created at C:\Users\Public\Documents\DXperience 12.1 Demos\eXpressApp Framework\MainDemo\CS\MainDemo.Web\obj\Release\Package\Archive
...build of project archive completed succesfully
...starting deployment to AWS Elastic Beanstalk environment 'zerosharp-maindemo'
...starting incremental deployment to environment 'zerosharp-maindemo'
Deployment to AWS Elastic Beanstalk failed with exception: Exception caught during execution of add command,
Inner Exception Message: The specified path, file name, or both are too long. The fully qualified file name must be less than 260 characters, and the directory name must be less than 248 characters.
...
Deployment to AWS Elastic Beanstalk environment 'zerosharp-maindemo' did not complete successfully

The problem is with the NGit libraries that the AWS Toolkit uses. Presumably a fix will emerge, but the simplest workaround is to move the application to a shorter path. Then you can enable incremental deployment when you publish:

Note that you can toggle incremental deployment whenever you publish, so you’re not locked in either way.

Next up

In the next post we will enable load balancing (which is easy) and discuss the problems with autoscaling XAF applications (which is not).

Deploy XAF ASP.NET Applications to Amazon Web Services: Part 3

| Comments

Part 3: Troubleshooting

This is the third post in a series about deploying ASP.NET applications to the Amazon cloud.

In Part 1 we created an Amazon RDS instance of SQL Server to act as the database for the deployment.

In Part 2 we published the DevExpress MainDemo.Web to the Amazon Elastic Beanstalk.

In this part we will look at troubleshooting methods and in particular how to connect to an EC2 instance in order to troubleshoot installations.

The Beanstalk Events tab

When there is a problem with the deployment, the first place to look is in the Elastic Beanstalk events tab. You will find warnings and error messages which frequently point to the source of any problem.

Sometimes, the events window point to a log file which is automatically generated in an S3 bucket. By opening S3 in the AWS Explorer, you can find and download the log file which usually has excellent error information in it, for instance:

An example log file
1
2
3
4
5
6
7
8
9
10
11
12
13
14
15
16
17
18
19
20
21
22
23
24
25
26
2012-11-02T12:37:13.000Z Warning 3:Web Event ASP.NET 4.0.30319.0 - Event code: 3008
    Event message: A configuration error has occurred.
    [...]

    Application information:
    Application domain: /LM/W3SVC/1/ROOT/MainDemo.Web_deploy-2-129963334311133960
    Trust level: Full
    Application Virtual Path: /MainDemo.Web_deploy
    Application Path: C:\inetpub\wwwroot\MainDemo.Web_deploy\
    Machine name: AMAZONA-C6H7CEI

    Process information:
    Process ID: 2436
    Process name: w3wp.exe
    Account name: IIS APPPOOL\DefaultAppPool

    Exception information:
    Exception type: ConfigurationErrorsException
    Exception message: Could not load file or assembly 'DevExpress.ExpressApp.AuditTrail.v12.1, Version=12.1.7.0, Culture=neutral, PublicKeyToken=b88d1754d700e49a' or one of its dependencies. The system cannot find the file specified. (C:\inetpub\wwwroot\MainDemo.Web_deploy\web.config line 94)
      at System.Web.Configuration.CompilationSection.LoadAssemblyHelper(String assemblyName, Boolean starDirective)
      at System.Web.Configuration.AssemblyInfo.get_AssemblyInternal()
      at System.Web.Compilation.BuildManager.GetReferencedAssemblies(CompilationSection compConfig)
      at System.Web.Compilation.BuildManager.CallPreStartInitMethods(String preStartInitListPath)
      at System.Web.Compilation.BuildManager.ExecutePreAppStart()
      at System.Web.Hosting.HostingEnvironment.Initialize(ApplicationManager appManager, IApplicationHost appHost, IConfigMapPathFactory configMapPathFactory, HostingEnvironmentParameters hostingParameters, PolicyLevel policyLevel, Exception appDomainCreationException)
    [...]

Connecting via Remote Desktop

If you’re still in the dark, you can use Windows Remote Desktop to connect to the EC2 machine to troubleshoot.

In the AWS Explorer, go to Amazon EC2/Instances.

There are two ways of connecting. You can Get Windows Passwords, but this takes about an hour for the password to be decrypted.

Alternatively, you can Open Remote Desktop and then Use EC2 keypair to logon. You should have the .pem private key file associated with the EC2 key pair that was used to launch the instance (it was created when you created your AWS account or when you launched your first EC2 instance). Whenever an EC2 instance is provisioned, it is launched with an EC2 key pair (you selected a keypair to use in the wizard above). You can open the .pem file and cut and paste the key into the remote desktop window.

You will then be logged in as an Administrator on the EC2 Instance running Windows 2008 R2. You can perform whatever operations you see fit - install software, change Control Panel options, restart IIS, etc. The changes will last until you terminate the instance (by deleting the Elastic Beanstalk stack for example).

Note that it is easy to create new key pairs if you can’t find the .pem file, but you cannot change the key pair of a running instance. (You should terminate and launch again with the new key pair). One nice feature of the AWS Toolkit, is that if you create a new key pair within Visual Studio, you can choose to store the private key in the Toolkit.

Next up

The next post will cover incremental deployment options.

Deploy XAF ASP.NET Applications to Amazon Web Services: Part 2

| Comments

Part 2: Publishing MainDemo

This is the second post in a series about deploying ASP.NET applications to the Amazon cloud.

In Part 1 we created an Amazon RDS instance of SQL Server to act as the database for the deployment. Make sure this is up and running before continuing.

This part guides you through publishing the DevExpress XAF MainDemo application to the Amazon Elastic Beanstalk.

Amazon Elastic Beanstalk

Amazon Elastic Beanstalk provides automatic capacity provisioning, load balancing, auto-scaling, and application health monitoring. That sounds like a lot of features we don’t really need for the MainDemo, so let me explain.

With Amazon Web Services, the choices are endless. An Amazon EC2 instance is a virtual machine running an actual Windows (or other) operating system that you can connect to with Remote Desktop and configure however you want. It might seem that the simplest would be to put everything on a ‘single machine’ instance. However, the default ‘single machine’ does not have SQL Server Express installed. We could connect to it and install it, but it ends up being a lot of extra steps. There are other Amazon Machine Images (AMIs) that include SQL Server Express, but these don’t support automatic deployment from Visual Studio.

In fact (and Amazon should advertise this better), the Elastic Beanstalk is designed to make it very simple to deploy applications quickly even if you have no intention of ever needing more than a single little instance. It is the recommended starting point for all new deployments regardless of size. Ignore the long list of amazing additional features for now, (but one day you might need them.)

Prepare the MainDemo for deployment

First we need to fix a few problems with the MainDemo. (These will cause deployment in problems any environment, not just Amazon Web Services.)

  • remove the reference to stdole in the web.config <assemblies> section
  • add a reference to the project DevExpress.XtraPrinting.v12.1
  • add a reference to the project DevExpress.XtraNavBar.v12.1
  • add a reference to the project DevExpress.Utils.v12.1.UI
  • set the CopyLocal flag to true for all DevExpress assemblies

(Some of these might have been fixed if you are using a newer release of XAF than 12.1.7.)

Also, if there are any errors, we don’t get much useful feedback unless we turn custom errors off. Go to the web.config and add a tag just before the end of the <system.web> section.

    ...
      <customErrors mode="Off"/>
    </system.web>

Make sure you can build without errors.

Deploy to Elastic Beanstalk

You might like to switch to Release mode since we will be publishing. Right click on the MainDemo.Web project in the Solution Explorer and select Publish to AWS…

This opens the AWS publishing wizard. Select the AWS Elastic Beanstalk template. I have also selected to deploy in the EU West (Ireland) region. Click Next.

Make sure you uncheck the Deploy application incrementally checkbox (see the upcoming Part 4 for more information on this option).

The next few screens are self-explanatory.

(Note the keypair property is referred to in Part 3 in the section about connecting via Remote Desktop.)

The following screen appears only if we have active RDS instances running (which you should if you followed Part 1). It allows us to add a permission for the application to access the database. This can also be done manually via the Security Groups section in the AWS Explorer.

The last screen summarizes all the choices so far.

After you click Launch, you can follow the progress in the Amazon Web Services output window. It will upload the MainDemo web deployment package to a temporary S3 bucket. It will then provision an EC2 instance and install the application to it. It will also provision an Elastic Load Balancer and connect up all the pieces. This will all take a few minutes.

Navigate to the Deployed MainDemo

Launch your browser and navigate to the instance web address which will look something like http://zerosharp-maindemo.elasticbeanstalk.com/. It should forward you to the login page. Login as Sam. Depending on whether the database needs to be created, this may take a couple of minutes and may even time out. I had to wait a minute and then click Login again before I was in.

When you have finished don’t forget to terminate both the Elastic Beanstalk application and the DB Instance (right click and ‘Delete’ from the AWS Explorer) otherwise you will be charged for the time the machines are provisioned. You can always check that everything has terminated properly in the AWS Console.

Next up

In the next posts we will look some additional details:

References

Deploy XAF ASP.NET Applications to Amazon Web Services: Part 1

| Comments

Part 1: Putting the Database in the Cloud

This is the first part of a tutorial for installing the DevExpress MainDemo.Web to Amazon Web Services, but the same principles apply to any ASP.NET web application.

This part covers creating an Amazon RDS instance running SQL Server Express and connecting a (locally running) MainDemo to it.

At the time of writing the DevExpress version is 12.1.7.

Amazon Web Services

If you have not already done so, you will need to sign up with Amazon Web Services. There are costs associated with AWS, but the tutorial only uses very small cheap instances which cost as little as 2 cents per hour to run. Also, new customers get a load of hours for free as part of the AWS Free Usage Tier. See the AWS pricing for more information. Don’t forget to terminate your instances when you have finished.

AWS Toolkit

Amazon have made it all easy by providing a Visual Studio add-in.

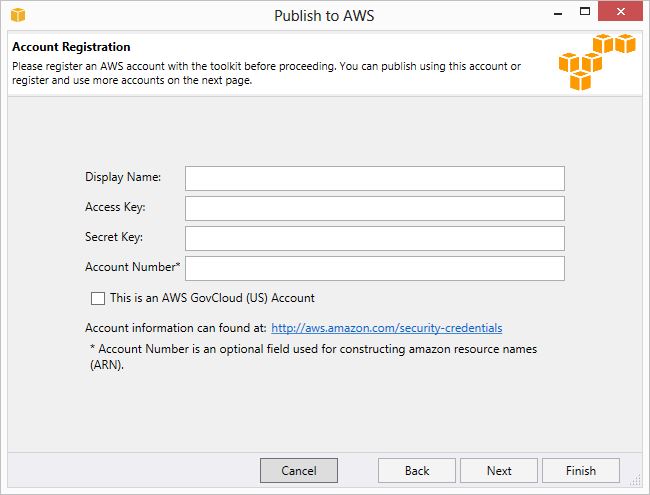
Install the AWS Toolkit for Microsoft Visual Studio. If you haven’t used it before, then when you start a wizard it will ask you for your AWS fcredentials.

The Display Name is the a name you give to the AWS account you are using. I set mine to zerosharp. This is helpful when you have multiple AWS accounts. The Access Key and the Secret Key are both available on the security credentials page - you will have to click Show in order to display the secret key. You can leave the account number blank.

The database

Now let’s provision a new SQL Server Express database.

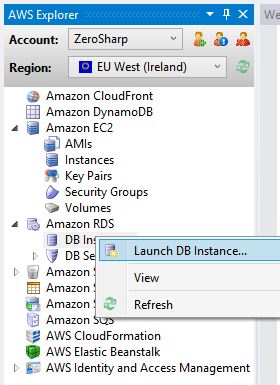
In Visual Studio, open the AWS Explorer (Ctrl+K,A or in the View menu). You probably want to select a region near your physical location. I chose EU West (Ireland). Right-click on ‘Amazon RDS’ and select ‘Launch Instance’.

"figure 2"

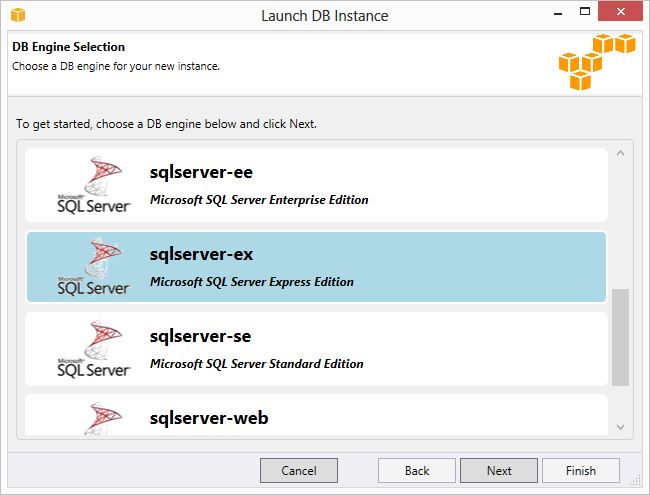
At the following screen, select SQL Server Express. Note that we could just as easily provision the Standard or Enterprise editions as well as a host of other database options.

"figure 3"

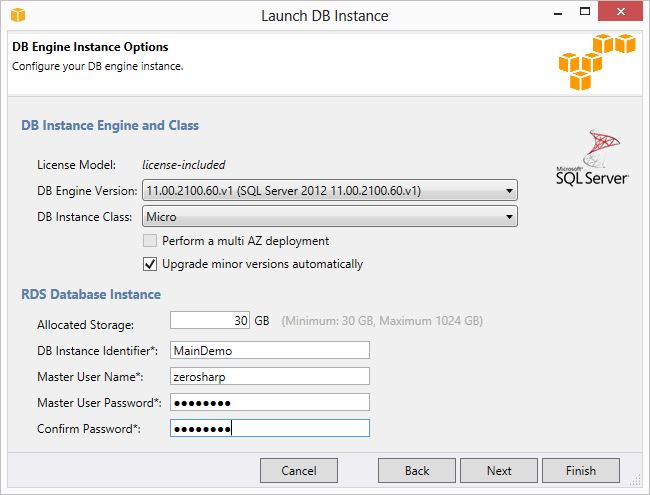
Configure the settings for the connection. Choose an instance class of Micro which is fine for our needs. Note the Master User Name and the Master User Password will be needed when we modify the MainDemo’s connection string.

"figure 4"

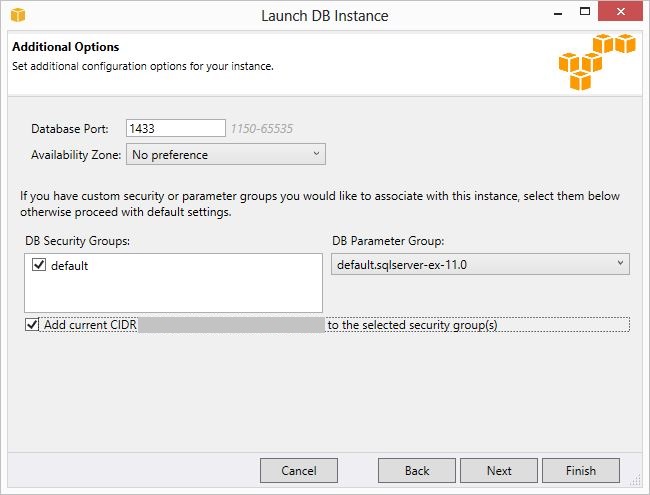
In this screen we configure settings for the port and security. In order to connect from our local MainDemo, you need to add the permission for the your CIDR route which will let you connect to the database from your local machine. It’s easy to add it to the default group later (via DB Security Groups).

"figure 5"

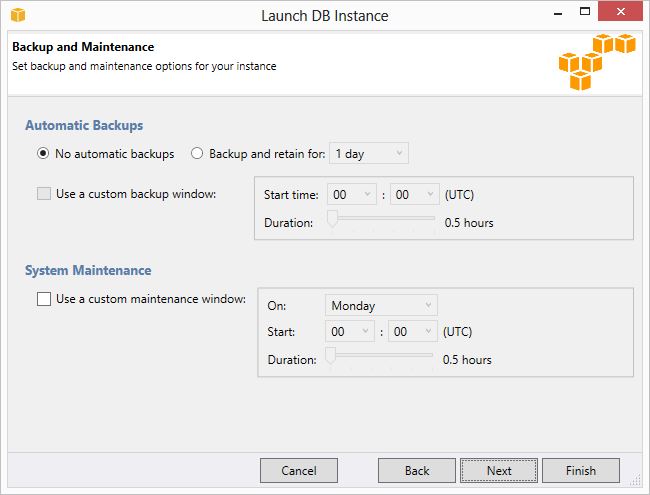
Set the backup options to ‘No backups’. Nice to have the option though.

"figure 6"

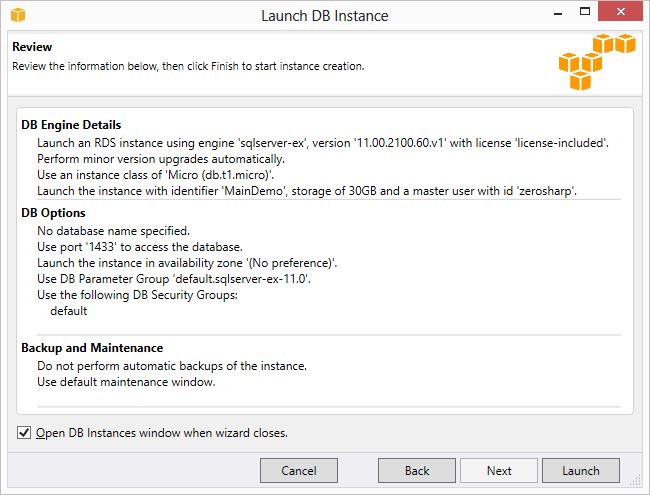
Review the options and click ‘Launch’.

"figure 7"

The database instance will be available after a few minutes. You have to be patient here - there is not much feedback, just the yellow creating status. You can press ‘Refresh’ once in a while, but it’s likely to take up to 15 minutes. Eventually you should see a green created status.

Modify the MainDemo connection string

Open the MainDemo in Visual Studio. Open the web.config file and set the connection string to point to your Amazon RDS instance.

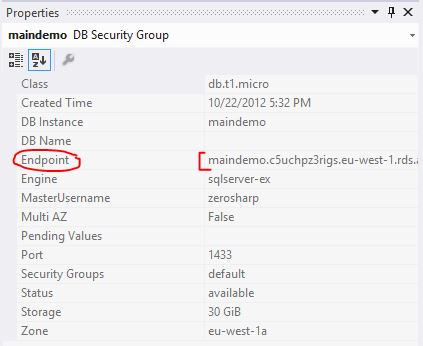
The ‘User ID’ and ‘Password’ should be the same as the ones you entered above. The address is available from the Visual Studio Properties window as ‘Endpoint’ when you select the DB Instance in the AWS Explorer.

"figure 8"

My connection string looks like this:

<add name="ConnectionString" connectionString="User ID=zerosharp;Password=password;Pooling=false;Data Source=maindemo.c5uchpz3rigs.eu-west-1.rds.amazonaws.com;Initial Catalog=MainDemo_v12.1"/>    

Run the MainDemo locally

Now run the MainDemo locally. When you get to the login page, login as Sam (no password). At this point, the MainDemo will connect to the Amazon RDS instance using the connection string we specified above and create the database (which takes at least 30 seconds on my machine). Afterwards the MainDemo will function as normal.

Next up

In the next post I explain how to publish the MainDemo application itself to an EC2 instance in the Amazon cloud.

Incompatible Character Encodings When Generating Octopress

| Comments

I started getting an encoding error whenever I tried to generate my Octopress blog with rake generate. The error message was:

Liquid error: incompatible character encodings: UTF-8 and IBM437

I tried to save all my recently modified files with UTF-8 encoding, but I couldn’t get the error to go away until I found a solution on this blog in Chinese.

Set two environment variables (via Control Panel/System/Advanced System Settings/Environment Variables) as follows:

LC_ALL = en_US.UTF-8
LANG = en_US.UTF-8

Now my blog generates without error.