ZeroSharp

Robert Anderson's ones and zeros

Load Testing XAF: Overview

| Comments

Over the next few posts, I will demonstrate how to load test XAF web applications.

History

Performance testing has traditionally been difficult and expensive. A few years ago, to do it well required a powerful piece of dedicated load testing software such as HP LoadRunner (typical cost back in 2007: USD 50,000-100,000 or more per year!). This software was capable of simulating multiple virtual users via the use of recorded scripts and providing detailed performance statistics. Usually the cost was increased further increased by the need for powerful hardware to be able to run the application.

In 2007 we were required by a big customer (a global bank) to provide load testing statistics for our expressApp Framework application. We could not afford anything as sophisticated as LoadRunner so we went with a cheaper alternative (NeoLoad, which was still several thousand per year). It was extremely painstaking work to produce a test. The approach was to record the http requests (as a stream of text values) and write a script to check the http response. Since there was no real browser involved, it was very difficult to determine if our test was really representative. Several machines in the office had to be dedicated to simulating virtual users. Nobody was allowed to use the internet for fear of skewing the results during a test. If an error occurred, it was almost impossible to determine what went wrong. We wrestled with it and managed to fulfill our requirements, but it was all a lot of effort for no real return.

Part of the problem was certainly that XAF is complex to test. The user interface is rich and makes use of complex controls. Most of these load testing tools work better when targetting a simple <INPUT type="button"> rather than an image of a button that sometimes is not even clickable until the mouse has hovered over it. DevExpress have made it easy to run tests via their EasyTests, but no load testing tool supports them yet. (They have informed me it’s in their plans…)

Enter the cloud

The basic idea is this: instead of simulating users with specialised software, why not fire up a virtual machine and test with a real browser instance which is ‘remote controlled’ via a script.

The increased availability of cheap cloud-based virtualised machines has revolutionised load testing. The rental of the virtualised machines is not free, but it is very cheap. In about 2008, I started using the Amazon cloud to perform load tests. Our basic test costs us about USD 10.00 per run. We probably run this a dozen times a year, so our total cost is about USD 120.00 per year.

We get better statistics than we ever got out of NeoLoad. We are confident that the test is realistic and we can compare with the actual performance of our production environments. We have been able to find and solve memory leak problems and various tricky multi-user problems with these tests.

Load testing is still a complex business. There are a lot of pieces to put together, but with the cloud, each piece is relatively simple and cheap.

The solution

  • In Part 1, we install the DevExpress MainDemo on an Amazon EC2 instance.
  • In Part 2, we use Selenium to write a script which will run on the client machines to control a real browser instance.
  • In Part 3, we create a NeuStar Web Performance test and validate the script.
  • In Part 4, we launch a performance test and monitor the server.
  • In Part 5, we analyse the results of the clients.
  • In a bonus part, we learn how to run multiple simultaneous EasyTests as an alternative method of isolating performance and concurrency problems.

If you follow all the steps, expect to pay a handful of dollars in Amazon EC2 costs and a few more in Neustar costs. You could alternatively skip step 1 and target one of your own development machines instead.
How to Recursively Change File Ownership

| Comments

I recently ran into some file ownership trouble after cloning a bitbucket repository.

The following script saved my bacon.

FixOwnership.ps1
1
2
3
4
5
6
7
8
9
# This script recursively fixes the ownership on the files in the 
# current and subdirectories.

$acct1 = New-Object System.Security.Principal.NTAccount('Administrators')
$profilefolder = Get-Item .
$acl1 = $profilefolder.GetAccessControl()
$acl1.SetOwner($acct1)
dir -r . | set-acl -aclobject $acl1
pause

Colourful Git Command Line

| Comments

For Valentine’s Day, why not make your git command line a little more colourful.

git config --global color.ui true

A C# Developer’s Adventures in iOS - Integrating Git and MonoDevelop

| Comments

This is the second post in a series about iOS development from the perspective of a C# developer.

In the previous post in the series we got started with MonoTouch and installed MonoDevelop and XCode. In this post, we’ll look at how to set up version control for an existing MonoTouch solution.

Version Control

I didn’t have enough time at the hackathon to learn how to set up version control for MonoDevelop on a Mac. So let’s fix that straight away.

Git

I’m much more familiar with Mercurial, and while it’s possible to get TortoiseHg to run on a Mac, it seems that the Mac world prefers Git. MonoDevelop has Git integrated which I like very much so I’ll go with Git for now. I can always switch later.

Ignore files

Open a terminal and navigate to the root of your existing source code folder.

$ cd Projects/Babingo # replace with /path/to/your/repo

You need a .gitignore file to avoid version controlling compiled sources and user settings unnecessarily.

Create a new file .gitignore as follows. You can type nano .gitignore if you don’t have a favourite text editor.

.gitignore
1
2
3
4
5
6
7
8
9
10
11
12
13
14
15
16
17
18
19
# OSX specific
.DS_Store
*.lock
*.swp
*.lock

# Build folders
[Bb]in/
[Oo]bj/

# User specific
*.userprefs
*.usertasks

# Mono project files
*~
*.pidb
*.resources
test-results/

Initial commit

Now initialise a repository for your existing source code and commit it.

$ git init
$ git add .
$ git commit -m "Initial commit."

BitBucket

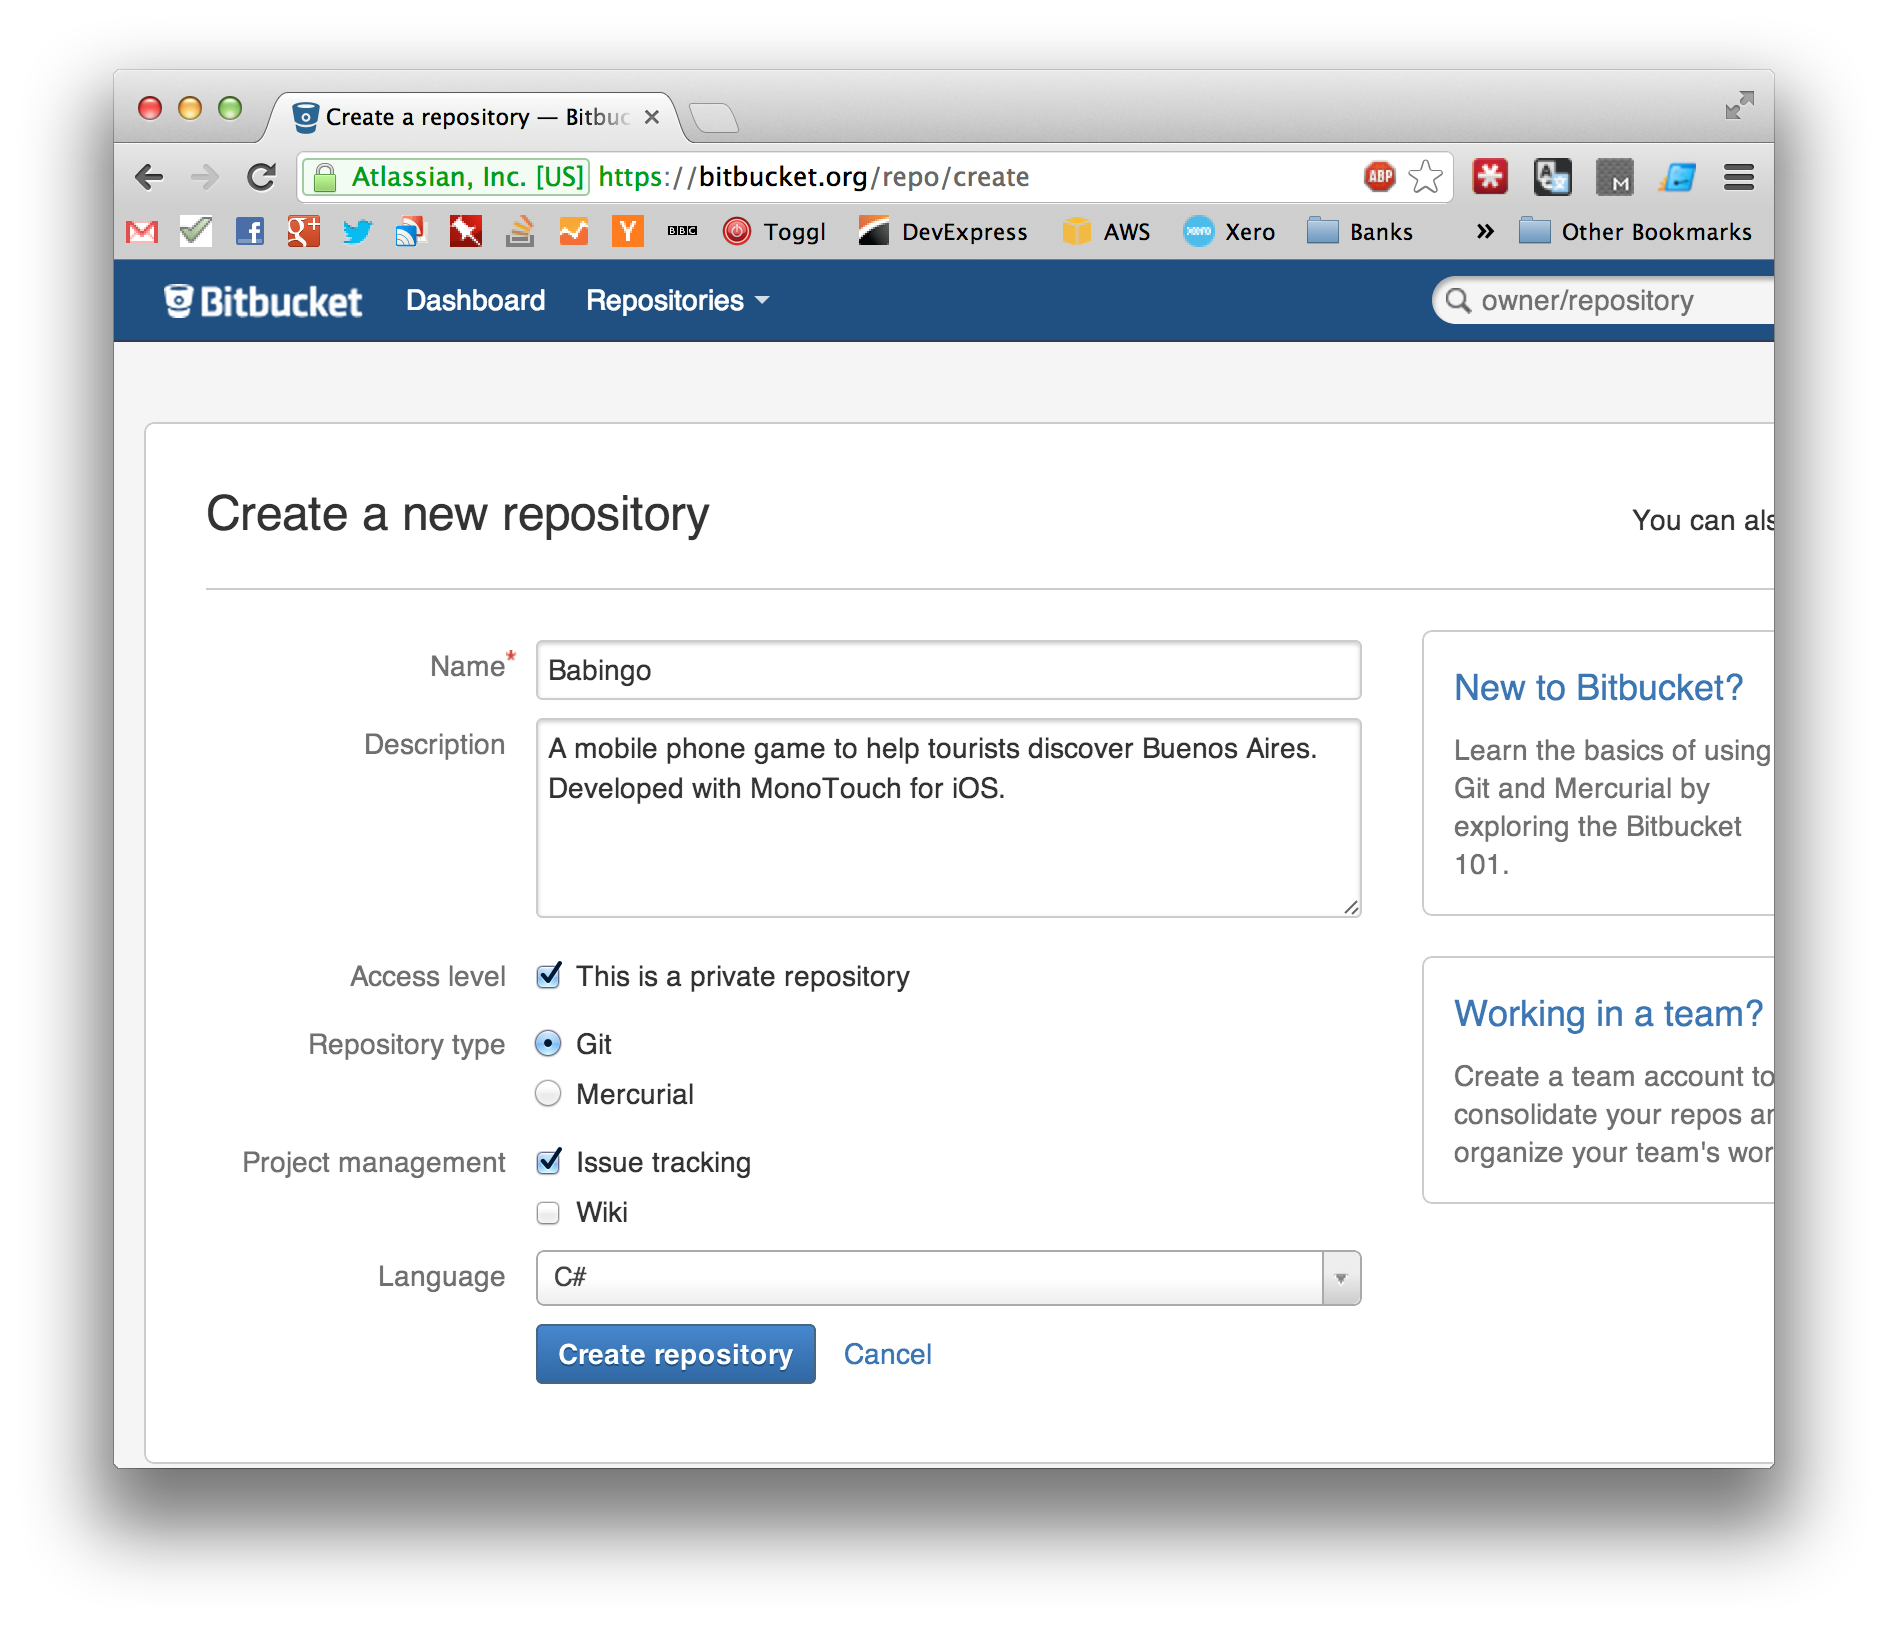
Next create a private repository on BitBucket.

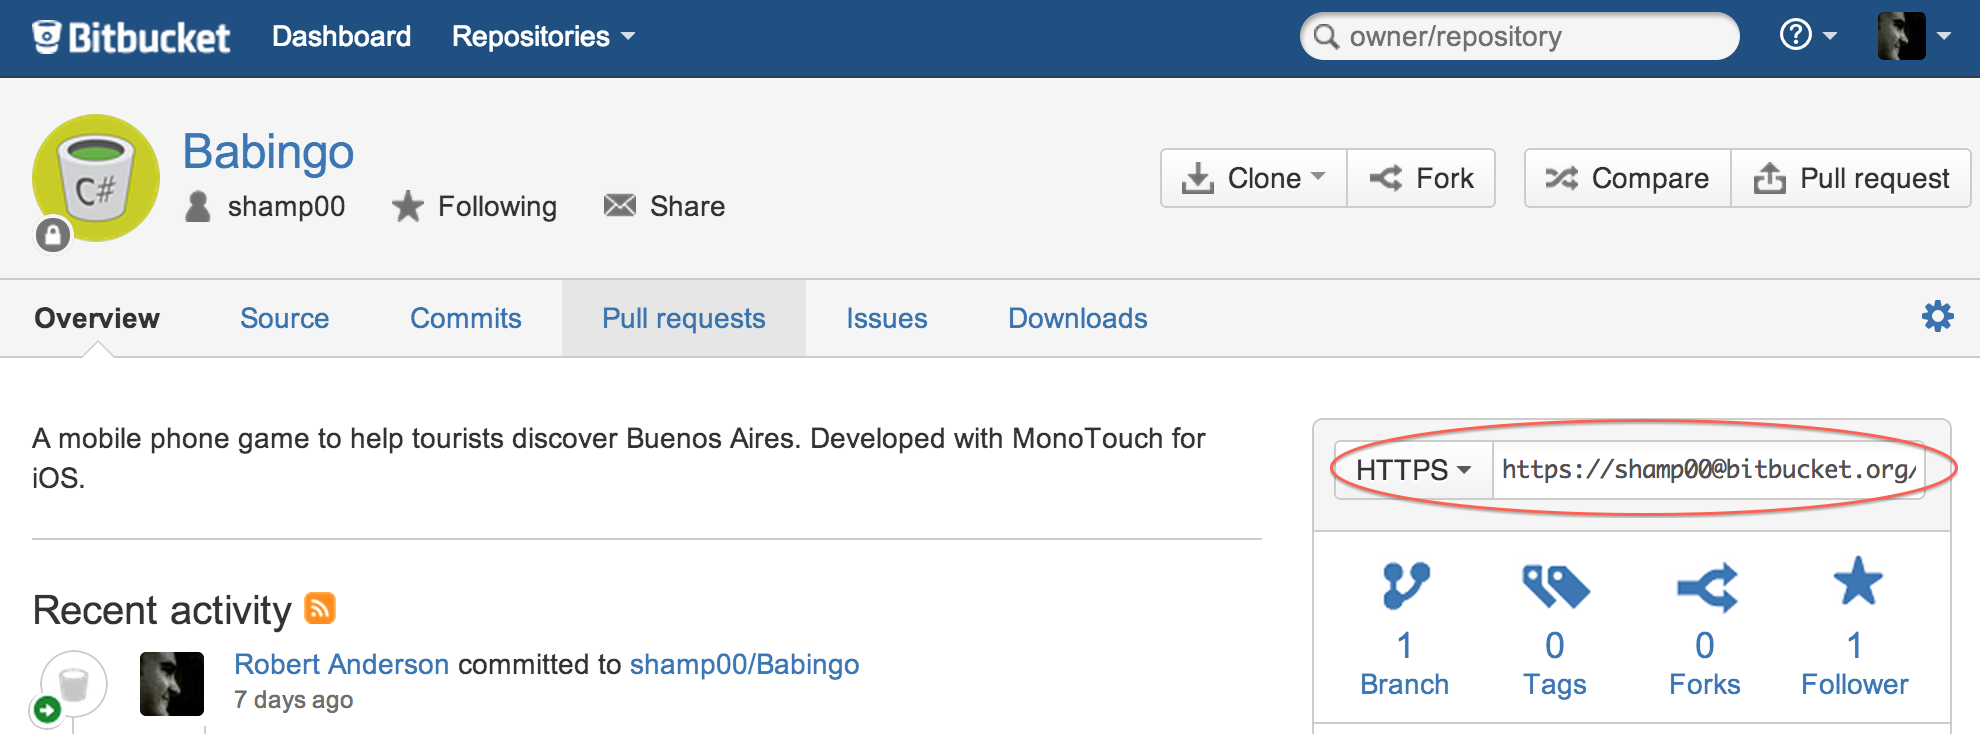
You will need the address for your repository from the BitBucket page circled in red below.

Then, from the terminal, push the code to BitBucket. Replace the Url below with the address of your your own repository.

$ git remote add origin https://shamp00@bitbucket.org/shamp00/babingo.git     
$ git push -u origin --all

Integration with MonoDevelop

Open your solution in MonoDevelop and select the Checkout... option from the Version Control menu.

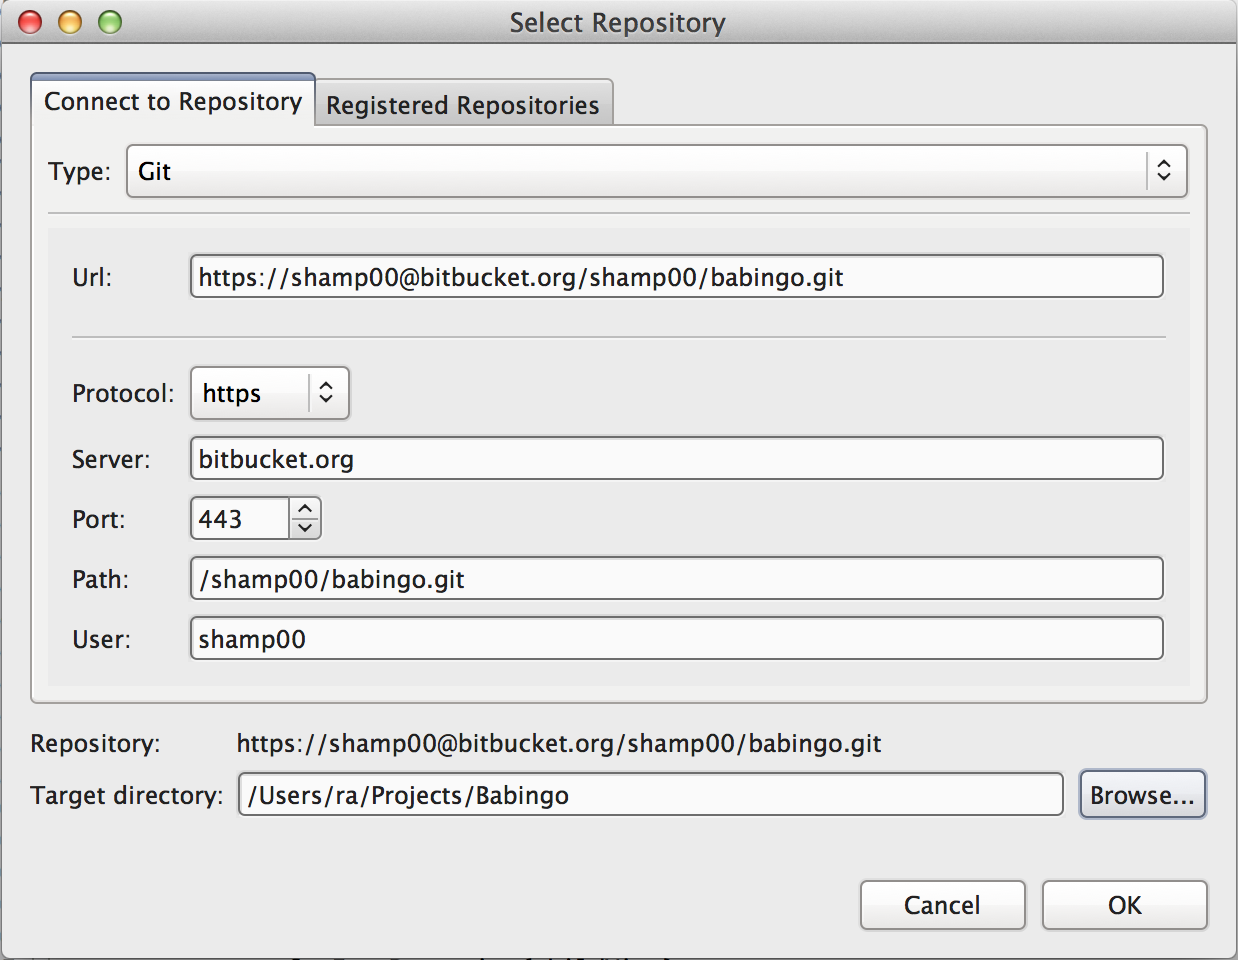
Select Git as the type of repository and put the address to your git repository in the Url field. The rest of the fields are populated automatically. You need to set the Target Directory to the location of your local repository including the trailing slash.

When you click Ok, you will be prompted for your BitBucket credentials.

That’s it. Now Git is integrated into your MonoDevelop environment. For instance, you can right-click in the editor to view the diff or the log of the current file, push changes, commit messages locally, etc.

Note that instead of BitBucket, it would have been just as straightforward to host the repository on GitHub instead.

Clone Your Octopress to Blog From Two Places

| Comments

This post covers how recreate a local repository of your Octopress blog. Perhaps you’ve accidentally lost it, or perhaps you would like to be able to blog from two different places. Recently I bought a new computer and I wanted to be able to blog from both my desktop and my laptop.

How Octopress works

Octopress repositories have two branches, source and master. The source branch contains the files that are used to generate the blog and the master contains the blog itself.

When the local folders are initially configured according to the Octopress Setup Guide, the master branch is stored in a subfolder named ‘_deploy’. Since the folder name begins with an underscore, it is ignored when you git push origin source. Instead, the master branch (which contains your blog posts) gets updated when you rake deploy.

Recreating a local Octopress repository

To recreate the local directory structure of an existing Octopress blog, follow these instructions.

Clone your blog to the new machine

First you need to clone the source branch to the local octopress folder.

$ git clone -b source git@github.com:username/username.github.com.git octopress

Then clone the master branch to the _deploy subfolder.

$ cd octopress
$ git clone git@github.com:username/username.github.com.git _deploy 

Then run the rake installation to configure everything

$ gem install bundler
$ rbenv rehash    # If you use rbenv, rehash to be able to run the bundle command
$ bundle install
$ rake setup_github_pages

It will prompt you for your repository URL.

Enter the read/write url for your repository
(For example, 'git@github.com:your_username/your_username.github.com)

That’s you setup with a new local copy of your Octopress blog.

Pushing changes from two different machines

If you want to blog from more than one computer, you need to make sure that you push everything before switching computers. From the first machine do the following whenever you’ve made changes:

$ rake generate
$ git add .
$ git commit -am "Some comment here." 
$ git push origin source  # update the remote source branch 
$ rake deploy             # update the remote master branch

Then on the other machine, you need to pull those changes.

$ cd octopress
$ git pull origin source  # update the local source branch
$ cd ./_deploy
$ git pull origin master  # update the local master branch

Of course, it might be easier to deploy everything from a thumb drive instead…

Installing Ruby With Homebrew and Rbenv on Mac OS X Mountain Lion

| Comments

Install Ruby with rbenv

I decided to setup Octopress on my Mac so that I can publish blog posts from either Windows or MacOS. I’m on OS X 10.8.2.

I tried to follow the Octopress instructions for installing Ruby but ran into a few problems.

Install Homebrew

Homebrew is a package manager for OS X. Open Terminal and install Homebrew with:

$ ruby -e "$(curl -fsSkL raw.github.com/mxcl/homebrew/go)"

Once the installation is successful, you can run the following command to check your environment.

$ brew doctor

Apparently, you should see:

Your system is raring to brew

But instead I had 3 warnings.

Warning: /usr/bin occurs before /usr/local/bin
This means that system-provided programs will be used instead of those
provided by Homebrew. The following tools exist at both paths:

    gcov-4.2

Consider amending your PATH so that /usr/local/bin
occurs before /usr/bin in your PATH.

This one can be fixed by modifying your .profile file. Create it if it doesn’t already exist. Use nano ~/.profile if you don’t have a preferred editor.

.profile
1
2
3
# Fix $PATH for homebrew
homebrew=/usr/local/bin:/usr/local/sbin
export PATH=$homebrew:$PATH

Google tells me the other two warnings are related to Mono being installed and can be ignored.

Warning: /Library/Frameworks/Mono.framework detected
This can be picked up by CMake's build system and likely cause the build to
fail. You may need to move this file out of the way to compile CMake.

Warning: You have a non-Homebrew 'pkg-config' in your PATH:
  /usr/bin/pkg-config => /Library/Frameworks/Mono.framework/Versions/2.10.9/bin/pkg-config

This was most likely created by the Mono installer. `./configure` may
have problems finding brew-installed packages using this other pkg-config.

Ploughing on…

Install rbenv

Rbenv handles the installation of multiple Ruby environments.

$ brew update
$ brew install rbenv
$ brew install ruby-build

Install gcc

If I try to install Ruby immediately, I get

ERROR: This package must be compiled with GCC, but ruby-build
couldn't find a suitable `gcc` executable on your system.
Please install GCC and try again.
...

XCode used to ship with a compatible gcc, but no longer does. We can install it with Homebrew.

$ brew update
$ brew tap homebrew/dupes
$ brew install autoconf automake apple-gcc42

The new gcc will coexist happily alongside the default one.

Install Ruby 1.9.3

Now we can install Ruby.

$ rbenv install 1.9.3-p194
$ rbenv rehash

Next run

$ ruby --version

Hmm… I get

ruby 1.8.7 (2012-02-08 patchlevel 358) [universal-darwin12.0]

Shouldn’t it say ruby 1.9.3? It turns out you need to add the following to the end of your .profile.

.profile
1
2
# Initialize rbenv
if which rbenv > /dev/null; then eval "$(rbenv init -)"; fi

Now quit and restart Terminal.

$ rbenv global 1.9.3-p194
$ ruby --version
ruby 1.9.3p194 (2012-04-20 revision 35410) [x86_64-darwin12.2.1]

Ruby 1.9.3 is installed correctly. If I quit and restart Terminal, ruby --version is still 1.9.3.

A C# Developer’s Adventures in iOS - Getting Started

| Comments

First steps in iPhone development

This is the first in a series of posts about developing an iOS application from the perspective of a Windows C# developer.

Startup Weekend

On a recent month-long trip to South America, I took part in the Buenos Aires Startup Weekend hackathon and my team came second!. The application we built is a treasure hunt game for tourists which helps them discover Buenos Aires. At the beginning of the weekend I knew nothing about mobile development. It was the first time I developed software using a Mac.

First, let’s look at the basic requirements for the environment.

Xamarin MonoTouch

MonoTouch is the easiest approach for C# developers. It allowed me to write a basic native iPhone app in a weekend with no prior mobile development experience. I’d never used MonoDevelop or XCode either.

MonoTouch is a software development kit for MacOS that cleverly enables you to use C# and the common .NET libraries (via Mono) along with bindings for the Apple Cocoa Touch framework to create native applications for iPhone, iPad and iPod. A lot of the tools are the same as for Objective-C developers: you use the iPhone Simulator and the XCode Interface Builder.

If you are a C# developer still wondering whether to learn Objective-C, there is a magnificent StackOverflow answer comparing MonoTouch and Objective-C.

Costs

There are some costs associated with becoming a MonoTouch iOS developer.

You need a Mac. I’m using a 15” MacBook Pro. I have it configured for dual boot, but I’m using the MacOS side for this project.

You will need to sign up as an iOS developer with Apple. This costs $99 per year. More information about Apple developer programs on their site.

You will need Xamarin MonoTouch which currently costs $399 for a one year single seat license for a single developer. More information on pricing at the Xamarin store.

Setting up the environment

Xamarin have an excellent installation guide which guides you through installing both XCode and MonoTouch.

Hello World

The next step is to create your first iOS application running in the iPhone simulator. Go through the samples in the MonoTouch getting started guide.

Next up

Over the next few weeks I’m aiming to finish the app I built for Startup Weekend and I’ll be sharing what I learn along the way.

My Amateur Git Skills Have Lead to an RSS Deluge

| Comments

I was trying to upgrade to the latest Octopress version but it seems I did something with the atom.xml file and some of you got every single post as ‘new’ in your RSS readers. Not sure what I did, but sorry for any extra mouse clicks. All working now.

Facebook Graph Search Pwns Your Privacy

| Comments

Facebook’s new Graph Search allows you to easily see anybody’s photos.

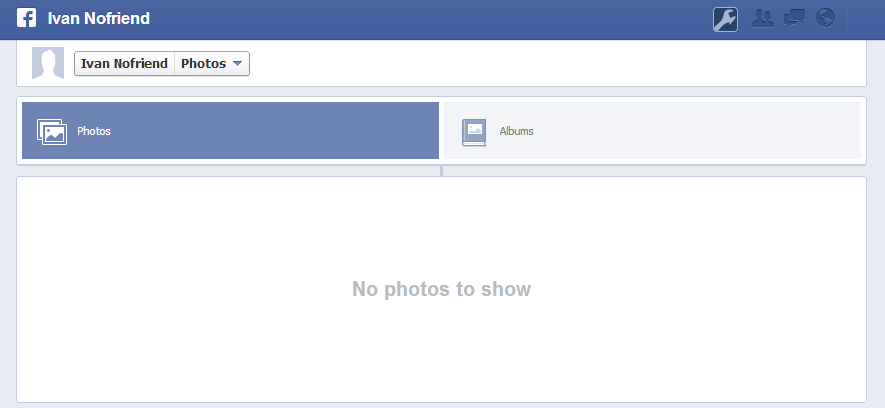
First, search for someone who is not a friend. Most often, if you navigate to their photos, you see something like this:

You can’t see any photos because their privacy settings are not set to ‘Public’. It’s what you’d expect.

Use Graph Search to bypass privacy

If you put Photos of <name> or Photos by <name> into the new Facebook graph search you can view all their photos regardless of their privacy settings. This works even for friends who have put you on a ‘limited’ profile.

Your boss/ex/grandma is probably checking out your private photos right now.

Image Captions for Octopress

| Comments

I wanted to add captions to some of my images and came across this forum thread, from which I was able to piece together Ted Kulp’s slick solution.

The following markdown

 {% imgcap http://some.url.com/pic.jpg Leonhard Euler %} 

will render like this.

Leonhard Euler

It works with left and right too.

The changes

First, create the image_caption_tag plugin and put it in the plugins subfolder.

plugins/image_caption_tag.rb
1
2
3
4
5
6
7
8
9
10
11
12
13
14
15
16
17
18
19
20
21
22
23
24
25
26
27
28
29
30
31
32
33
34
35
36
37
38
39
40
41
42
# Title: Image tag with caption for Jekyll
# Description: Easily output images with captions

module Jekyll

  class CaptionImageTag < Liquid::Tag
    @img = nil
    @title = nil
    @class = ''
    @width = ''
    @height = ''

    def initialize(tag_name, markup, tokens)
      if markup =~ /(\S.*\s+)?(https?:\/\/|\/)(\S+)(\s+\d+\s+\d+)?(\s+.+)?/i
        @class = $1 || ''
        @img = $2 + $3
        if $5
          @title = $5.strip
        end
        if $4 =~ /\s*(\d+)\s+(\d+)/
          @width = $1
          @height = $2
        end
      end
      super
    end

    def render(context)
      output = super
      if @img
        "<span class='#{('caption-wrapper ' + @class).rstrip}'>" +
          "<img class='caption' src='#{@img}' width='#{@width}' height='#{@height}' title='#{@title}'>" +
          "<span class='caption-text'>#{@title}</span>" +
        "</span>"
      else
        "Error processing input, expected syntax: {% img [class name(s)] /url/to/image [width height] [title text] %}"
      end
    end
  end
end

Liquid::Template.register_tag('imgcap', Jekyll::CaptionImageTag)

Next, modify the _utilities.scss file as follows.

sass/base/_utilities.scss
1
2
3
4
5
6
7
8
9
10
   border: $border;
 }

+@mixin reset-shadow-box() {
+  @include shadow-box(0px, 0px, 0px);
+}
+
 @mixin selection($bg, $color: inherit, $text-shadow: none){
   * {
     &::-moz-selection { background: $bg; color: $color; text-shadow: $text-shadow; }

Finally, apply the following changes to the _blog.scss file.

sass/partials/_blog.scss
1
2
3
4
5
6
7
8
9
10
11
12
13
14
15
16
17
18
19
20
21
22
23
24
25
26
27
   article {
     font-size: 2.0em; font-style: italic;
     line-height: 1.3em;
   }
-  img, video, .flash-video {
+  img, video, .flash-video, .caption-wrapper {
     @extend .flex-content;
     @extend .basic-alignment;
     @include shadow-box;
+    &.caption {
+      @include reset-shadow-box;
+    }
+  }
+  .caption-wrapper {
+    display: inline-block;
+    margin-bottom: 10px;
+    .caption-text {
+      background: #fff;
+      text-align: center;
+      font-size: .8em;
+      color: #666;
+      display: block;
+    }
   }
   video, .flash-video { margin: 0 auto 1.5em; }
   video { display: block; width: 100%; }

Regenerate your Octopress site and you can start using imgcap instead of img.