ZeroSharp

Robert Anderson's ones and zeros

DevExpress 13.2 Review - Part 1

| Comments

The first version of XAF I ever installed was called eXpressApp-1.0.CTP2.exe in July 2006! It has certainly come a long way since then.

This post is the first part of an overview of the brand new version XAF 13.2 which will be released any day now. This part is an in-depth review of the new report writer features (still in beta).

Reports V2

Prior to this version, XAF reports were not source code. They were objects serialized to a file and then loaded into the database during initialisation. This has a lot of shortcomings some of which I have addressed in previous blog posts.

But now finally it is now possible to build XAF reports directly from Visual Studio. DevExpress is calling this Reports V2 and it largely supersedes my previous workarounds. The immediate advantages of Reports V2 are:

  • Build time syntax checking
  • Easily merge/compare report versions
  • Painless version control of reports
  • Better unit testing possibilities

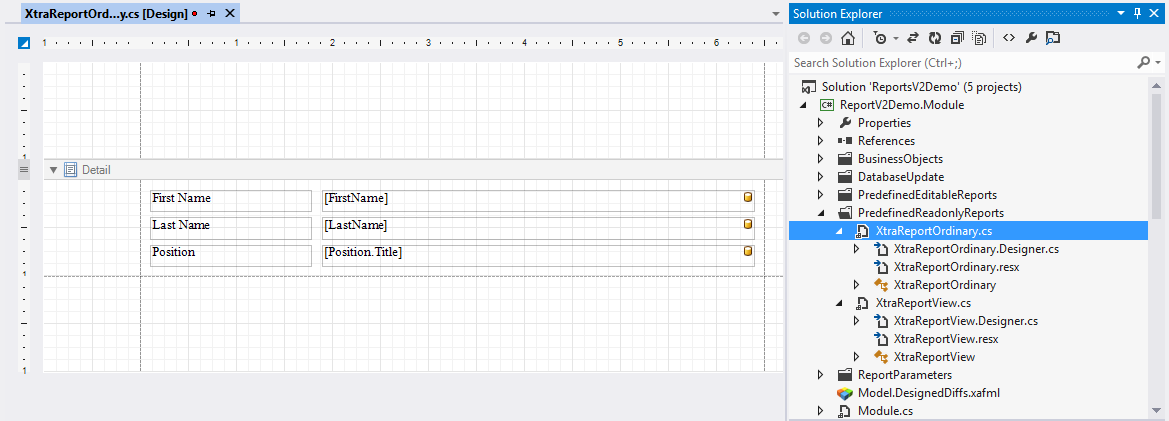
Let’s have a look at the details. DevExpress have provided us with a new sample project called ReportsV2Demo. The interesting part of the project solution is here:

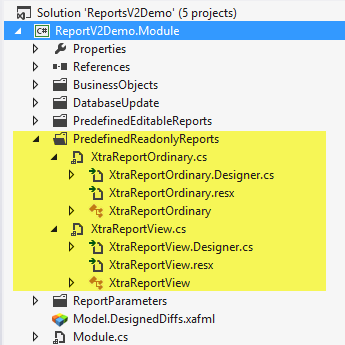
Notice that there are two folders containing reports. PredefinedEditableReports contains V1 reports. That is, the report is serialised as a string and loaded into the database during initialisation. If we look at the source for one of these, here is what it looks like:

1
2
3
4
5
6
7
8
9
10
11
12
13
14
namespace ReportV2Demo.Module.PredefinedEditableReports {
    public class OrdinalReportResource {
        public static string ReportLayout = @"
/// <XRTypeInfo>
///   <AssemblyFullName>DevExpress.XtraReportsVSuffix, Version=dllVersion, Culture=neutral, PublicKeyToken=dllPublicKeyToken</AssemblyFullName>
///   <AssemblyLocation>C:\Windows\Microsoft.Net\assembly\GAC_MSIL\DevExpress.XtraReportsVSuffix\v4.0_dllVersion__dllPublicKeyToken\DevExpress.XtraReportsVSuffix.dll</AssemblyLocation>
///   <TypeName>DevExpress.XtraReports.UI.XtraReport</TypeName>
///   <Localization>en-US</Localization>
///   <Version>VersionShort</Version>
///   <References>
///     <Reference Path=""C:\Windows\Microsoft.Net\assembly\GAC_MSIL\DevExpress.Persistent.BaseVSuffix\v4.0_dllVersion__dllPublicKeyToken\DevExpress.Persistent.BaseVSuffix.dll"" />
///     <Reference Path=""C:\Windows\Microsoft.Net\assembly\GAC_MSIL\System\v4.0_4.0.0.0__b77a5c561934e089\System.dll"" />

/// etc.

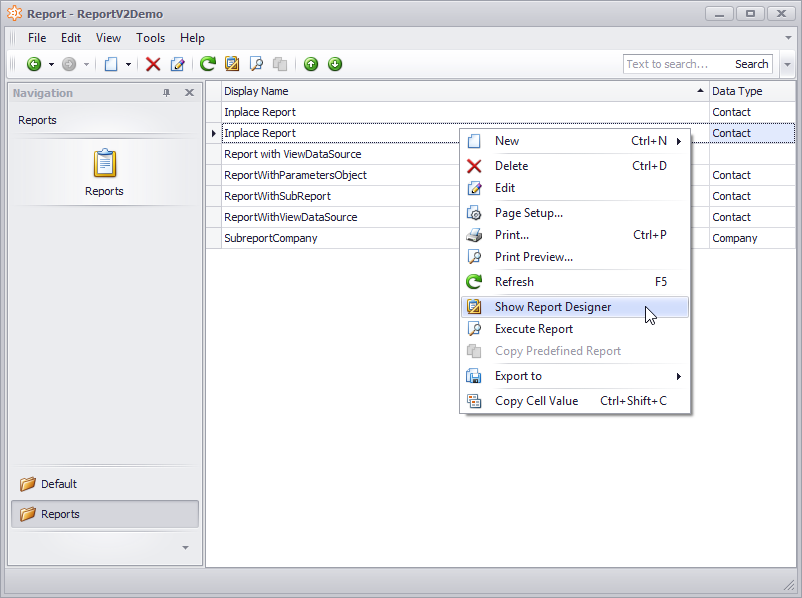
The second folder, PredefinedReadonlyReports contains the V2 reports. With these reports, we can right-click and View Designer and up pops the XtraReport designer.

Now I can make changes to my report within Visual Studio. In theory I can preview the report and view the HTML output. However, in the beta (13.2.4) the Preview view prints the report correctly but fails to fetch any data so all the fields are empty (maybe this is by design).

(Actually, I think the names of these folders could be improved. Maybe XafReports vs. XtraReports. Or RuntimeReports vs. DesigntimeReports.)

With respect to event scripts which in the past were particularly arduous to maintain, we now have two options.

Scripts option 1 - Use serialized scripts

Firstly, you can continue to use the scripts as before. You can use Visual Studio’s Properties window to navigate to the script you need and then add the necessary code in the custom editor.

Unfortunately, this is not the best from a maintenance perspective. The Scripts code editor view is not at all comparable to Visual Studio. No Intellisense. No CodeRush. In addition, the script itself gets serialized to a string.

1
2
this.ScriptsSource = "\r\nprivate void xrLabel2_BeforePrint(object sender,System.Drawing.Printing.PrintE" +
    "ventArgs e) {\r\n    string something = \"something\";\r\n}\r\n";

So unfortunately this approach does not improve things much with regard to compile-time syntax checking or code merging/version control.

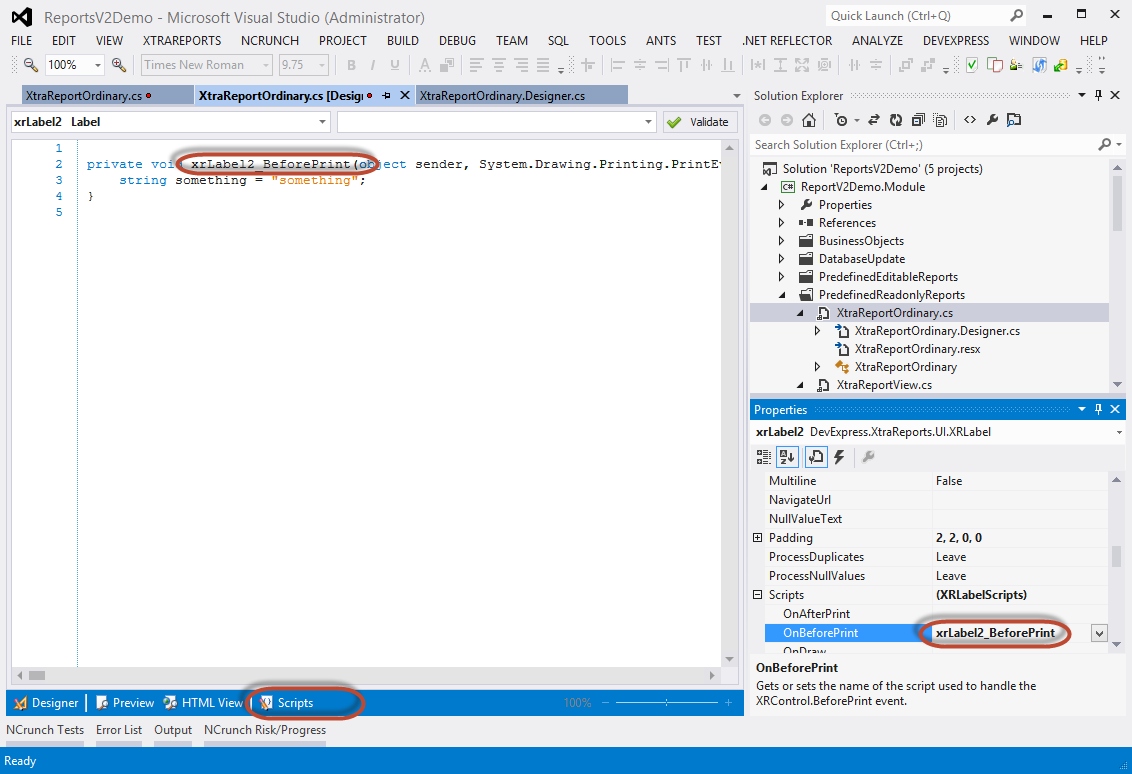
Scripts option 2 - Move the scripts to the C# file

Now that the report is more like an XtraReport, we can attach an event in code. To test it I’ll replace the output of the First name with the current time.

1
2
3
4
5
6
7
8
9
10
11
12
13
14
public partial class XtraReportOrdinary : DevExpress.XtraReports.UI.XtraReport
{
    public XtraReportOrdinary()
    {
        InitializeComponent();
        xrLabel2.BeforePrint += xrLabel2_BeforePrint;
    }

    private void xrLabel2_BeforePrint(object sender, System.Drawing.Printing.PrintEventArgs e)
    {
        // Today's date and time
        xrLabel2.Text = DateTime.Now.ToString("G");
    }
}

Now let’s see if it works. We start up the web application and run the report.

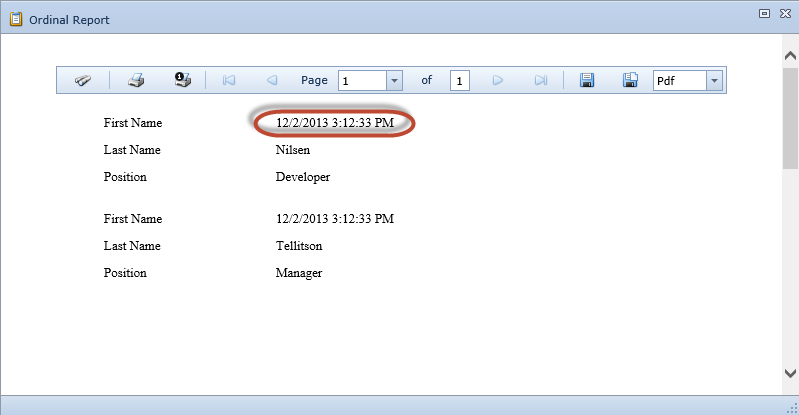
Excellent! You can see the report has successfully run the event and is displaying the current time instead of the first name. Here are the advantages of handling events this way.

  • If there’s a mistake in an event, the project will not compile until it’s fixed.
  • The code is more readable.
  • The source code of the events can easily be compared with older versions.
  • The source code can be merged much more easily when handling version control conflicts.
  • Unit testing of the events becomes feasible.

Runtime tailoring

Can an end-user still make a copy and tailor the report as they could with the older versions? Yes they can! Let’s start up the WinForms client and have a look.

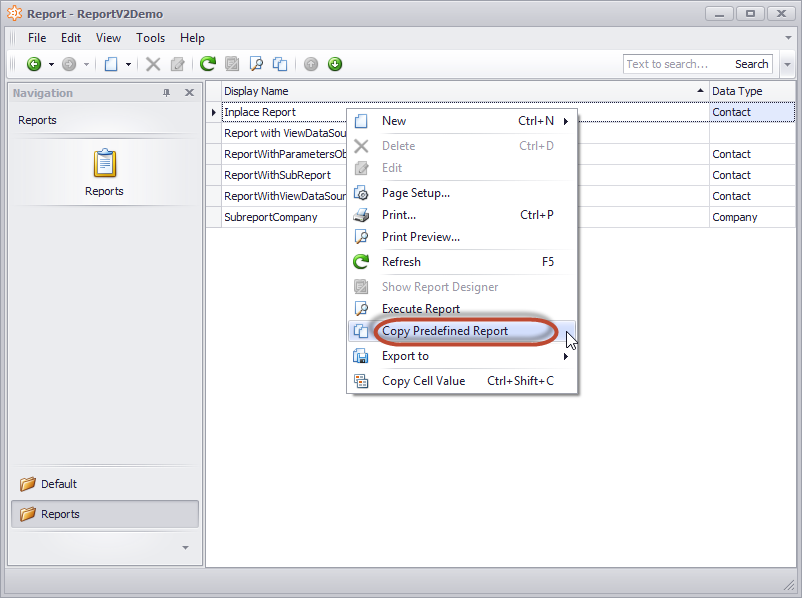
Each of the PredefinedReadonlyReports has a new option Copy predefined report. Also, notice that the Show Report Designer is greyed out. Now compare with the copy.

This time it is the Copy predefined report is greyed out and the familiar Show Report Designer has become available. (A little suggestion to the DevExpress crew. It would be better if the new copy got renamed to Copy of Inplace Report like Windows does when copying a file). Now we can open the Report Designer and customise the report further. Fantastic!

Let’s check what happened to our events?

Well, the serialized event was copied correctly, but the script that we put in the C# file has not been copied. A bit unfortunate - that event would have to be re-written or copied manually from the C# source file, but in most cases, additional tailoring of reports is a one-off occasional activity. For me at least, the benefits of having more maintainable code outweigh the inconvenience of losing the events when cloning a report.

Conclusions

Reports V2 is certainly the most significant improvement to the XAF reporting engine yet. I’m sure there are a few beta issues to iron out and a few further improvements down the line. In this post, I haven’t looked at features such as views, sub-reports and custom reporting components, all of which deserve further investigation.

In my main development project, there are currently 110 different reports and maintaining them takes some effort. Reports V2 will help considerably. Hats off to the DevExpress team.

Next up

In my next post I’ll be taking a look at the new soft validation along with some other 13.2 improvements.

How to Improve XAF Grid Layout for Chrome

| Comments

This post proposes a workaround for a specific XAF rendering problem related to recent versions of Google Chrome.

Here is an XAF list view as it looks with IE 10 and DevExpress 13.1.8.

This is how the same view looks with Chrome 30. Notice how the column widths are rendered poorly. The minimum space is given to the string field and the date and bool fields are too wide.

What’s going on? An update to the Chrome browser occurred in which has caused problems with the rendering of grid views in certain situations. The problem exists in all versions of Chrome great than 25 and also affects the Google Chrome Frame plugin for IE.

DevExpress were able to fix some scenarios in 13.1.4 and 12.2.11 (such as column sorting), but there are other situations which still pose problems (e.g. the fix does not resolve the problem if the Auto Filter Row is enabled, which is the case above.)

Hopefully the Chrome devs will one day fix the root problem. You can keep an eye on the issue here

The fix

Not so much a fix as a workaround. We use a ViewController<ListView> to set the grid layout to UseFixedTableLayout, but only for Chrome browsers. Something like this:

1
2
3
4
5
6
7
8
9
10
11
12
13
14
15
16
17
18
19
20
21
22
23
24
25
26
27
28
29
30
31
32
33
34
35
/// <summary>
/// Switches to fixed table layout for the main list view when using Chrome or ChromeFrame.
/// </summary>
public class ChromeSpecificListViewController : ViewController<ListView>
{
    protected override void OnViewChanging(View view)
    {
        base.OnViewChanging(view);
        Active["IsChrome"] = IsChrome;
    }

    private static bool IsChrome
    {
        get
        {
            HttpContext context = HttpContext.Current;
            return context != null && context.Request.Browser.Browser == "Chrome";
        }
    }

    protected override void OnViewControlsCreated()
    {
        base.OnViewControlsCreated();

        ASPxGridListEditor listEditor = View.Editor as ASPxGridListEditor;
        if (listEditor == null)
            return;

        ASPxGridView gridView = listEditor.Grid as ASPxGridView;
        if (gridView == null)
            return;

        gridView.Settings.UseFixedTableLayout = true;
    }
}

The resulting view in Chrome:

That looks better. You may notice the columns will allways be the same width now, which is not quite as good as the IE rendering. As such, it may not be appropriate for all views. But since it’s a ViewController it’s easy to deactivate it by adding an Active[] criteria.

References

Three Ways to Store a List of Currency Codes in XAF

| Comments

In the last post we looked at three solutions to a relatively simple XAF requirement. In this post I’ll discuss another XAF challenge, explain the options and provide a versatile and maintainable solution.

In my DevExpress XAF application, I have an object which has several properties like this:

In each case, the field is a comma-separated list of currency codes. These fields are not very important to the model - they are used mainly for reporting.

Let’s look at 3 different ways of handling these fields.

Option 1 - Use a string field

The lightest option would be just to declare them as a normal XPO string field:

1
2
3
4
5
6
7
8
9
10
11
12
private string _List1Currencies;
public string List1Currencies
{
    get
    {
        return _List1Currencies;
    }
    set
    {
        SetPropertyValue("List1Currencies", ref _List1Currencies, value);
    }
}

It’s certainly simple and maintainable, but it’s not very user-friendly. There is no fancy interface to help with the input. We can perhaps improve things slightly by providing edit masks and/or validation rules to check the input, but careful typing is the only way to change the values.

Option 2 - Declare an association property

The heaviest option is to declare each such property as a many-to-many relationship.

1
2
3
4
5
6
7
8
9
10
11
12
13
14
15
16
17
18
19
20
21
22
23
24
public class Container: XPObject {
    public Container(Session session) : base(session) { }

  public string Name;

    [Association("List1Currencies")]
    public XPCollection<Currency> List1 {
        get { return GetCollection<Currency>("List1"); }
    }
}

public class Currency: XPObject {
    public Currency(Session session) : base(session) { }

    [Size(3)]
    public string Code;

  public string Name;

    [Association("List1Currencies")]
    public XPCollection<Container> List1Container {
        get { return GetCollection<Container>("List1Container"); }
    }
}

This works great - we get a nice interface for selecting the currencies and the end result looks like this:

However, it’s quite a heavy solution for something quite simple. For each such relationship XPO will generate a new intermediate table. If we look at the database schema, we see the following:

And in the model there are two new views.

If we have 5 such properties, we end up with 5 intermediary tables and 10 new views.

Now, depending on your requirements that may be acceptable. If those relationships are important to your model, then the overhead may be justified. In my situation, these are minor fields and I do not want to burden the model or the database with extra complexity if I can avoid it.

Option 3 - Create a custom property editor

With the help of the documentation and old Support Center issues, I was able to quite quickly put together a custom editor which gives the end user a nice interface while keeping it simple. The bulk of the logic is in the SerializedListPropertyEditor base class (see the end of the article for the link to the code), but the principle is as follows:

Create a new subclass:

1
2
3
4
5
6
7
8
9
10
11
12
13
14
15
16
[PropertyEditor(typeof(String), false)]
public class CurrencyListPropertyEditor : SerializedListPropertyEditor<Currency>
{
    public CurrencyListPropertyEditor(Type objectType, IModelMemberViewItem info)
        : base(objectType, info) { }

    protected override string GetDisplayText(Currency currency)
    {
        return String.Format("{0}\t{1}", currency.Code, currency.Name);
    }

    protected override string GetValue(Currency currency)
    {
        return currency.Code;
    }
}

Then decorate each property with a ModelDefault attribute to set the PropertyEditorType.

1
2
3
4
5
6
7
8
9
10
11
12
13
private string _List1Currencies;
[ModelDefault("PropertyEditorType", "Solution1.Module.Web.CurrencyListPropertyEditor")]
public string List1Currencies
{
    get
    {
        return _List1Currencies;
    }
    set
    {
        SetPropertyValue("List1Currencies", ref _List1Currencies, value);
    }
}

Now the user gets a pretty editor to select the currencies, but the field is just a string field.

The editor supports use of the [DataSourceProperty] and [DataSourceCriteria] properties too, so you can easily filter the collection.

It is easy to provide a similar editor for any object type - just create a new subclass of SerializedListPropertyEditor<T> where T is your persistent type.

You can download a working sample project on GitHub.

The Ugly, the Heavy and the Good: 3 Solutions to an XAF Layout Problem

| Comments

This post aims to look at various solutions to a seemingly simple layout change.

With DevExpress XAF, a lot of the difficult things are easy: authentication, authorisation, ORM, reporting, complex form layouts, themes, etc., are all made easy by XAF. On the other hand, some of the easy things are hard. It can be frustratingly difficult to make a small modification to the basic layout. We will look at an example of such a change and evaluate the recommended DevExpress approaches.

The problem

Whenever my XAF web application asks me to change my password, I get a screen like this:

Well that’s a bit annoying - those edit boxes are far too wide. Wouldn’t it look much better if it were narrower and centered? If we weren’t using XAF, we’d probably have a separate aspx file for this view and we could just modify the html. With XAF there are several different recommended ways of modifying the output.

Option 1: Use the model

Well, one approach would be to use the layout designer to add some EmptySpaceItems to the default layout for the ChangePasswordOnLogon. Add something like this to MainDemo.Web/Model.xafml:

1
2
3
4
5
6
7
8
9
10
11
12
13
14
15
16
17
18
19
20
21
22
23
  <Views>
    <DetailView Id="ChangePasswordOnLogonParameters_DetailView">
      <Layout>
        <LayoutGroup Id="Main" Removed="True" />
        <LayoutGroup Id="Narrow" RelativeSize="50" HorizontalAlign="Center" Direction="Horizontal" IsNewNode="True">
          <LayoutItem Id="EmptySpaceItem1" Index="0" ViewItem="" RelativeSize="25" IsNewNode="True" />
          <LayoutGroup Id="Main" ShowCaption="False" Index="1" IsNewNode="True">
            <LayoutGroup Id="Static" Index="0" Direction="Horizontal" ShowCaption="False" IsNewNode="True">
              <LayoutItem Id="ChangePasswordImage" Index="0" ShowCaption="False" RelativeSize="1" ViewItem="ChangePasswordImage" IsNewNode="True" />
              <LayoutItem Id="ChangePasswordText" Index="1" ShowCaption="False" RelativeSize="99" ViewItem="ChangePasswordText" IsNewNode="True" />
            </LayoutGroup>
            <LayoutGroup Id="SimpleEditors" Index="1" ShowCaption="False" IsNewNode="True">
              <LayoutGroup Id="ChangePasswordOnLogonParameters" ShowCaption="False" Index="0" IsNewNode="True">
                <LayoutItem Id="NewPassword" ViewItem="NewPassword" Index="0" IsNewNode="True" />
                <LayoutItem Id="ConfirmPassword" ViewItem="ConfirmPassword" Index="1" IsNewNode="True" />
              </LayoutGroup>
            </LayoutGroup>
          </LayoutGroup>
          <LayoutItem Id="EmptySpaceItem2" Index="2" ViewItem="" RelativeSize="25" IsNewNode="True" />
        </LayoutGroup>
      </Layout>
    </DetailView>
  </Views>

Ugh. What a lot of work for such a small change. Another approach would be to make an equivalent model modification in code by subclassing ModelNodesGeneratorUpdater<ModelViewsNodesGenerator> but it would be even more effort.

Is it easy to maintain? Not especially. If we make any changes to the parameters object, we would have to update the layout again. It is quite likely we’d have to make revisions when upgrading the framework.

And does it work?

No!. It’s a little better but it still looks ugly because the OK and Cancel buttons are still out wide.

Verdict: too ugly

When should you use this approach?:

  • When the layout changes are within the main view area.

Let’s look at another option.

Option 2: Customise the ASP.NET template

If we were to follow the instructions here we can modify the HTML exactly as we want. Unfortunately, this is even more work. We would need to:

  • Create a new MyNarrowTemplateDialogContent.ascx
  • Modify the HTML within it to add a width to Form1
  • Find some way of applying this template to only the detail view for Change Password. This is currently not easy but there is an example project at the end of this issue.

We’d end up with quite a few new files to maintain for just one little layout fix…

Also, another problem with this approach is that it needs reviewing whenever a new version of the framework is released, because the default templates may have changed. Too much maintenance work for such a little change.

Verdict: too heavy

When should you use this approach?:

  • When the same layout changes are to be applied to the views of all or many different object types.
  • When the changes you are making are significant enough that they are hard to achieve by the solution below.

Option 3: Use a ViewController

The ViewController and WindowController are well-suited to this sort of task.

1
2
3
4
5
6
7
8
9
10
11
12
13
14
15
16
17
18
19
20
21
22
23
24
25
public class NarrowDialogViewController : ViewController<DetailView>
{
    protected override void OnActivated()
    {
        base.OnActivated();
        Active["ShouldUseNarrowForm"] = View.ObjectTypeInfo.Type == typeof(ChangePasswordOnLogonParameters); // see side-note below
    }

    protected override void OnViewControlsCreated()
    {
        base.OnViewControlsCreated();
        if (WebWindow.CurrentRequestPage != null)
        {
            var htmlForm = WebWindow.CurrentRequestPage.FindControl("Form2") as HtmlForm; // see note below
            if (htmlForm != null)
            {
                // make the form narrow
                htmlForm.Attributes.CssStyle.Add("width", Unit.Percentage(40).ToString());
                // center the form
                htmlForm.Attributes.CssStyle.Add("margin-left", "auto");
                htmlForm.Attributes.CssStyle.Add("margin-right", "auto");
            }
        }
    }
}

A side note: do not use TargetObjectType == typeof(ChangePasswordOnLogonParameters) instead of the OnActivated() override. This is because ChangePasswordParameters which is used when the user clicks on Change My Password is a subclass of ChangePasswordOnLogonParameters and we do not want that view to be narrowed because it appears in a popup window instead of the main window.

This solution is quite maintainable. We can delimit the views for which the modification applies making the controller is active. And the modification itself is relatively simple. It is also reasonably robust with regard to DevExpress upgrades. (They did just change the name of the main dialog Form Form1 in 12.1 to Form2 in 12.2, but it was the first time in years and it was simple to fix. Alternatively, you could use FindControl instead of using the hard-wired name).

Here’s the resulting output, horizontally centered in the browser window:

Verdict: good

When should you use this approach?:

  • When a layout change is easy to apply by modifying styles. When a change pertains only to one or few specific object types.

Conclusions

In this case, using a ViewController leads to relatively simple code and ease of maintenance. Other situations may well be better served by the other approaches.

DevExpress XAF is a powerful mature product. As such, it can be daunting to new users because of all the different approaches for applying changes. It is always possible to find an elegant maintainable solution, but sometimes it is not obvious, even when the required change is small.

A Review of NDepend 5

| Comments

NDepend is a commercial static analysis tool for .NET managed code. It’s been around a long time (since 2004!). Version 5 was just released and in this post I’m going to try it out on the DevExpress MainDemo.

In the past I have always thought of NDepend as a complex tool. I was never sure where to start. In version 5, a lot of work has been done to improve the learning curve. The installation process is easy and a wizard very quickly points you in the right direction.

After downloading the v5 trial and running the installation you get to the following screen.

You cannot miss that big red arrow. In fact, it’s even animated in the actual product. Click on it and choose a Visual Studio solution to analyse. I’m going to navigate to the DevExpress MainDemo 13.1.

So long as the project has been built at some point, NDepend works out what to analyse (otherwise you’ll get helpful warnings).

It is very fast and we get to this help screen.

Choose the dashboard.

Now that’s a lot of information, but it’s all well presented and easy to navigate. Let’s focus on the worst: I can see 2 Critical Rules Violated. Drill down to find out more:

It’s complaining that we have classes with duplicate names in our projects. In the pane on the left we can see what they are: 3 types named MainDemoWinApplication, 3 named Program, etc. And sure enough there are: MainDemo.Win, MainDemo.Win.Mdi and MainDemo.Win.Ribbon all duplicate those class names.

We can also see 2 TaskAnalysis1LayoutUpdater types and a quick search reveals that there’s one in the web module and another in the win module.

So NDepend has correctly discovered some potential issues. As we XAF fans know, this one is not really a problem, because those modules are never loaded into the same AppDomain, but nevertheless the information is accurate and relevant.

Lets have a brief look at the other screens. The dependency graph:

With a million options.

A dependency matrix.

A metrics view showing class and assembly sizes.

All with reams of helpful documentation.

Overall, the tool felt fast, responsive and stable. I’ve focused on the user interface aspects, but there is so much more. Some things you can do:

NDepend shines at providing a high-level overview of code quality and as such it is a very useful addition to any developer’s toolkit. There are some scenarios where NDepend would be particularly useful:

  • For a developer joining a mature project.
  • For a senior developer looking to track progress on a refactoring drive.
  • For helping evaluate the quality of an open source third party library.

In this quick review, I’m not going deep enough to say anything about whether the DevExpress MainDemo is good code or not - it’s just a sample project I happen to be quite familiar with. It might be interesting to unleash NDepend on the full DevExpress source code and maybe one day I’ll get around to writing a future post about that.

With regard to my own projects, I feel I’m so familiar with them that I ought to be aware of most of the recommendations NDepend is likely to make, but I’ll give it a spin and see what comes out…

Always Run Visual Studio as an Administrator

| Comments

I always run Visual Studio as an administrator. There are various reasons why this is necessary including:

  • using IIS with a web application
  • running web UI tests
  • profiling

In fact there’s a list on MSDN of all the actions you require administrator permissions.

Here is a way to make sure Visual Studio always opens with elevated privileges, even if you double click on a .sln file. (I’m running Windows 8.)

  • Right-click devenv.exe
  • Select Troubleshoot program
  • Check The program requires additional permissions
  • Click Next
  • Click Test the program…
  • Wait for the program to launch
  • Click Next
  • Select Yes, save these settings for this program
  • Click Close

If you have multiple versions of Visual Studio installed, you should repeat the operation for all of the following.

Program  Default location
 Visual Studio 2008   C:\Program Files (x86)\Microsoft Visual Studio 9.0\Common7\IDE\devenv.exe  
 Visual Studio 2010   C:\Program Files (x86)\Microsoft Visual Studio 10.0\Common7\IDE\devenv.exe  
 Visual Studio 2012   C:\Program Files (x86)\Microsoft Visual Studio 11.0\Common7\IDE\devenv.exe  
 VSLauncher.exe   C:\Program Files (x86)\Common Files\Microsoft Shared\MSEnv\VSLauncher.exe  


That’s it. Now Visual Studio always opens with administrator privileges.

Fix Visual Studio Update Links When Running as Administrator

| Comments

This post is about fixing an annoyance whereby Visual Studio refuses to update extensions when running as an administrator.

I always had a problem when an update to an extension or tool tried to open the browser. For instance, I would see this notification in the system tray.

And then when I went to Tools/Extensions and Updates… in Visual Studio, I’d get to something like this:

But the Update button was not responding to any clicks. The only workaround I found was to restart Visual Studio under my normal user account and then the button would work.

The fix at last

It turns out the problem rather specific. It only occurs when you run VS2012 as an administrator and you have Google Chrome set as your default browser. The problem is that older versions of Google Chrome failed to register themselves as the default browser for administrator users. You can confirm this by doing the following from an admin command prompt:

start http://blog.zerosharp.com

You’ll get a message saying Class not registered.

Unfortunately, updating to newer installations of Chrome does not fix the problem. You need to uninstall and reinstall. (This sounds like a lot of hassle, but if you are using Chrome sync it is very easy and only takes about a minute).

  • Uninstall Chrome by going to Control Panel/Uninstall a program. * Open IE and download Chrome.
  • During the installation process it will ask you to enable sync.
  • A few seconds later everything should be back as at it was.

But better, because the Update button in Visual Studio now works.

MiniProfiler With DevExpress XAF

| Comments

In this post I will demonstrate how to add MiniProfiler to the XAF MainDemo web application.

MiniProfiler is a simple fast profiler with a pretty user interface. It is fast because it only profiles code that you have explicitly decorated with the MiniProfiler.Step() method. It was designed by the team at StackOverflow.

First, add the MiniProfiler NuGet package to the MainDemo.Web project. Then add a placeholder to default.aspx just before the last <body> tag.

1
2
3
4
5
6
7
8
<!-- MiniProfiler -->
<!-- Include jquery here to avoid a bug in MiniProfiler. -->
<script src="https://ajax.googleapis.com/ajax/libs/jquery/1.7.1/jquery.min.js"></script>
<asp:PlaceHolder ID="mp" runat="server">
  <%= StackExchange.Profiling.MiniProfiler.RenderIncludes() %>
</asp:PlaceHolder>
</body>
</html>

(MiniProfiler uses jQuery, but it does not usually require XAF to include it since it will automatically retrieve it if missing. Unfortunately there is currently a bug which causes a ’jQuery is undefined’ javascript error when initially launching the application. The easiest workaround I found is to explicitly include jQuery before calling RenderIncludes(). Hopefully this will be fixed in a future version of MiniProfiler.)

In global.asax.cs add the following to the Application_Start method.

1
2
3
4
5
protected void Application_Start(object sender, EventArgs e) {
    RenderHelper.RenderMode = DevExpress.Web.ASPxClasses.ControlRenderMode.Lightweight;
+   MiniProfilerHelper.RegisterPathsToIgnore();
    ASPxWebControl.CallbackError += new EventHandler(Application_Error);
    // etc...

and modify BeginRequest and EndRequest as follows:

1
2
3
4
5
6
7
8
9
10
11
12
13
14
15
16
17
protected void Application_BeginRequest(object sender, EventArgs e) {
+   if (MiniProfilerHelper.IsEnabled())
+   {
+       MiniProfiler.Start();
+   }
    string filePath = HttpContext.Current.Request.PhysicalPath;
    if(!string.IsNullOrEmpty(filePath)
        && (filePath.IndexOf("Images") >= 0) && !System.IO.File.Exists(filePath)) {
        HttpContext.Current.Response.End();
    }
}

protected void Application_EndRequest(Object sender, EventArgs e)
{
+   if (MiniProfilerHelper.IsEnabled())
+       MiniProfiler.Stop();
}

Now we implement a helper class which determines whether profiling is enabled and which URLs to profile. We can use a variety of methods, the cookie probably being the most versatile one, but for the moment, the IsEnabled() function always returns true.

1
2
3
4
5
6
7
8
9
10
11
12
13
14
15
16
17
18
19
20
21
22
23
24
25
26
27
28
29
30
31
32
33
34
35
36
public static class MiniProfilerHelper
{
    public static bool IsEnabled()
    {
        // While we are testing let's always return true
        return true;

        // We should not profile if we are EasyTesting
        if (TestScriptsManager.EasyTestEnabled == true)
            return false;

        // We could choose to profile only local requests
        if (HttpContext.Current.Request.IsLocal)
            return true;

        // Or based on a cookie
        HttpCookie miniProfileCookie = HttpContext.Current.Request.Cookies["MainDemoMiniProfiler"];
        return miniProfileCookie != null && miniProfileCookie.Value != "0";
    }

    // Optionally ignore some paths to prevent the output being too busy.
    public static void RegisterPathsToIgnore()
    {
        if (!NetSecuritySettings.IsProfilingAllowed())
            return;

        List<String> ignoredByMiniProfiler = new List<String>(MiniProfiler.Settings.IgnoredPaths);
        // these are a substring search so wildcards are not supported
        ignoredByMiniProfiler.Add("SessionKeepAliveReconnect.aspx");
        ignoredByMiniProfiler.Add("TemplateScripts.js");
        ignoredByMiniProfiler.Add("EasyTestJavaScripts.js");
        ignoredByMiniProfiler.Add("MoveFooter.js");
        ignoredByMiniProfiler.Add("ImageResource.axd");
        MiniProfiler.Settings.IgnoredPaths = ignoredByMiniProfiler.ToArray();
    }
}

Done. Now whenever you run the web application, you get timing statistics for the loading of the assets. They appear as little clickable ‘chiclets’ in the top left of the browser page.

However, the real strength of MiniProfiler comes with the ability to add your own profiling steps. Let’s say we want to know exactly what percentage of the load takes place in the OnLoad event. Then we add the following to default.aspx.cs in order to add a ‘step’ to the MiniProfiler breakdown.

1
2
3
4
5
6
7
8
protected override void OnLoad(EventArgs e)
{
    var profiler = MiniProfiler.Current; // it's ok for this to be null
    using (profiler.Step("ASP.NET: Page_Load(Default)"))
    {
         base.OnLoad(e);
    }
}

Now, the output is a good deal richer. Also, note that if the MiniProfiler assembly is missing from the web application’s bin directory, the profiling is ignored completely without error.

As another example, let’s profile the FindBySubject controller action.

Add the MiniProfiler NuGet package to the MainDemo.Module project. Then modify the FindBySubjectController.cs as follows

1
2
3
4
5
6
7
8
9
10
11
12
13
14
15
16
17
18
19
private void FindBySubjectAction_Execute(object sender, ParametrizedActionExecuteEventArgs e)
{
+   var profiler = MiniProfiler.Current;
+   using (profiler.Step("FindBySubject")) // doesn't matter if profiler is null
+   {
        IObjectSpace objectSpace = Application.CreateObjectSpace();
        string paramValue = e.ParameterCurrentValue as string;
        if (!string.IsNullOrEmpty(paramValue))
        {
            paramValue = "%" + paramValue + "%";
        }
        object obj = objectSpace.FindObject(((ListView)View).ObjectTypeInfo.Type,
            new BinaryOperator("Subject", paramValue, BinaryOperatorType.Like));
        if (obj != null)
        {
            e.ShowViewParameters.CreatedView = Application.CreateDetailView(objectSpace, obj);
        }
+   }
}

Now navigate to the Tasks list view and enter some text where it says ‘Type Subject…’. You should see a new chiclet appear which contains the timing details as shown here.

MiniProfiler is a great tool for providing helpful profiling benchmarks, even in production. It’s often difficult to measure when a remote user complains to support that the site seems slow. How slow is slow? In a production environment, you can turn on MiniProfiler for the user (by setting a cookie for instance) and then ask them to share their profiling information for some basic operations. This information can be invaluable in determining where the fault lies.

You can play around with the sample solution up on GitHub.

Fluent Queries With DevExpress XPO - Implementation

| Comments

Continuing from my last post, I’ll demonstrate how to create a fluent interface so that you can do:

1
2
3
4
5
6
7
8
9
10
11
12
var customer = Session
                 .Query()
                 .InTransaction
                    .Contacts
                      .ByPosition("Developer")
                        .ThatHave
                          .NoPhoto()
                        .And
                          .TasksInProgress()
                        .And
                          .TasksWith(Priority.High)
                 .FirstOrDefault();

First, let’s look at the ‘beginning’ of the fluent interface: the Query() extension method.

1
2
3
4
5
6
7
8
9
10
11
12
13
14
15
public static class QueryExtensions
{
    public static IQueries Query(this Session session)
    {
        return new Queries(session);
    }

    // If we're using XAF, do the same for ObjectSpace as well
    public static IQueries Query(this IObjectSpace objectSpace)
    {
        var xpObjectSpace = objectSpace as XPObjectSpace;
        var session = xpObjectSpace.Session;
        return new Queries(session);
    }
}

What does the Queries() class look like?

1
2
3
4
5
6
7
8
9
10
11
12
13
14
15
16
17
18
19
20
21
22
23
24
25
26
27
28
29
30
31
32
33
34
35
36
37
38
39
40
public interface IQueries
{
    IQueries InTransaction { get; }
    IContactQueries Contacts { get; }
    // One for each queryable object type, e.g.,
    // IDepartmentQueries Departments { get; }       
    // ITaskQueries Tasks { get; }
    // etc.
}

public class Queries : IQueries
{
    public Queries(Session session)
    {
        _Session = session;
    }

    private readonly Session _Session;
    private bool _InTransaction;

    public IQueries InTransaction
    {
        get
        {
            _InTransaction = true;
            return this;
        }
    }

    private IContactQueries _Contacts;
    public IContactQueries Contacts
    {
        get
        {
            if (_Contacts == null)
                _Contacts = new ContactQueries(_Session, _InTransaction);
            return _Contacts;
        }
    }
}

If we ignore the InTransaction property, it is just a container for the IContactQueries. In your application, you would have a similar property for each queryable object type. A new ContactQueries instance is created on demand taking into account the whether the InTransaction property was visited earlier in the syntax.

Now, let’s look at the base classes.

1
2
3
4
5
6
7
8
9
10
11
12
13
14
15
16
17
18
19
20
21
22
23
24
25
public interface IQueries<T> : IEnumerable<T>, IFluentInterface
{
}

public class Queries<T> : IQueries<T>
{
    public Queries(Session session, bool inTransaction)
    {
        _Session = session;
        Query = new XPQuery<T>(session, inTransaction);
    }

    private readonly Session _Session;
    protected IQueryable<T> Query { get; set; }

    public IEnumerator<T> GetEnumerator()
    {
        return Query.GetEnumerator();
    }

    IEnumerator IEnumerable.GetEnumerator()
    {
        return Query.GetEnumerator();
    }
}

So Queries<T> wraps an XPQuery<T>.

Side note: the inclusion of IFluentInterface is a clever trick to improve Intellisense by hiding the System.Object members such as ToString(). See Daniel Cazzulino’s blog post.

And now we can implement the Contact generic as follows:

1
2
3
4
5
6
7
8
9
10
11
12
13
14
15
16
17
18
19
20
21
22
23
24
25
26
27
28
29
30
31
public interface IContactQueries : IQueries<Contact>
{
    IContactQueries ByDepartmentTitle(string departmentTitle);
    IContactQueries ByPosition(string position);
    Contact ByEmail(string email);
}

public class ContactQueries : Queries<Contact>, IContactQueries, IContactThatHaveQueries
{
    public ContactQueries(Session session, bool inTransaction)
        : base(session, inTransaction)
    {
    }

    public IContactQueries ByDepartmentTitle(string department)
    {
        Query = Query.Where(c => c.Department.Title == department);
        return this;
    }

    public IContactQueries ByPosition(string position)
    {
        Query = Query.Where(c => c.Position.Title == position);
        return this;
    }

    public Contact ByEmail(string email)
    {
        return Query.SingleOrDefault(c => c.Email == email);
    }
}

There we go. Now we can use our fluent interface:

1
var contacts = session.Query().Contacts.ByPosition("Manager");

Much more readable. Also more maintainable because all queries are in one place and make use of good old LINQ. It’s also easier to test the queries because they are independent of the calling code.

See a sample implementation built against the DevExpress XAF MainDemo on GitHub.

Fluent Queries With DevExpress XPO - Intro

| Comments

There are many ways to perform queries with XPO.

You can do this:

1
Session.FindObject<Contact>(new BinaryOperator("Name", "Elvis"));

or this

1
Session.FindObject<Contact>(CriteriaOperator.Parse("Name = 'Elvis'"));

Another way to use the simplified criteria syntax, and with the Xpo_EasyFields CodeRush plugin. Then you can do:

1
Session.FindObject<Contact>(Customer.Fields.Name == "Elvis");

For each of the above, you can optionally query within the transaction by passing in the PersistentCriteriaEvaluationBehavior.InTransaction parameter.

Or we can use LINQ via XPQuery<T>.TransformExpression().

1
2
3
Session.FindObject<Contact>(
    XPQuery<Contact>.TransformExpression(Session, c => c.Name == "Elvis")
    );

All of these methods are powerful, but the power comes at a cost. The syntax is neither elegant nor particularly clear and as a result it is not very practical to maintain or test.

A Fluent Interface for XPO

How about if we could do the following?

1
2
3
4
var customer = Session
                .Query()
                  .Contacts
                    .ByName("Elvis");

Or, for a more elaborate example:

1
2
3
4
5
6
7
8
9
10
11
12
var customer = Session
                 .Query()
                 .InTransaction
                    .Contacts
                      .ByPosition("Developer")
                        .ThatHave
                          .NoPhoto()
                        .And
                          .TasksInProgress()
                        .And
                          .TasksWith(Priority.High)
                 .FirstOrDefault();

In the next post I’ll show how to put the fluent interface code together.